Manual invoice processing ties up your finance team with repetitive work like entering invoice details into your company’s accounting software, categorizing line items, and double-checking vendor information for accuracy. These time-consuming tasks often lead to mistakes, especially when handling hundreds or thousands of invoices.
An AI Invoice Manager from Glide helps automate invoice processing and reduces processing times by 30% while working with the accounting system your company already uses—no need to overhaul your entire process or switch to a complex new platform. Here’s how you can use it.

How you can use AI to speed up human work
What are AI agents?How to use the automated invoice processing agent
The Invoice Manager AI agent automates the most time-consuming and error-prone parts of receiving and processing an invoice into your accounting software, like data entry and manual transcription. All you need are your invoices—whether they’re in your email inbox or saved as files—and you’re ready to go. Here’s how you can put it to work.
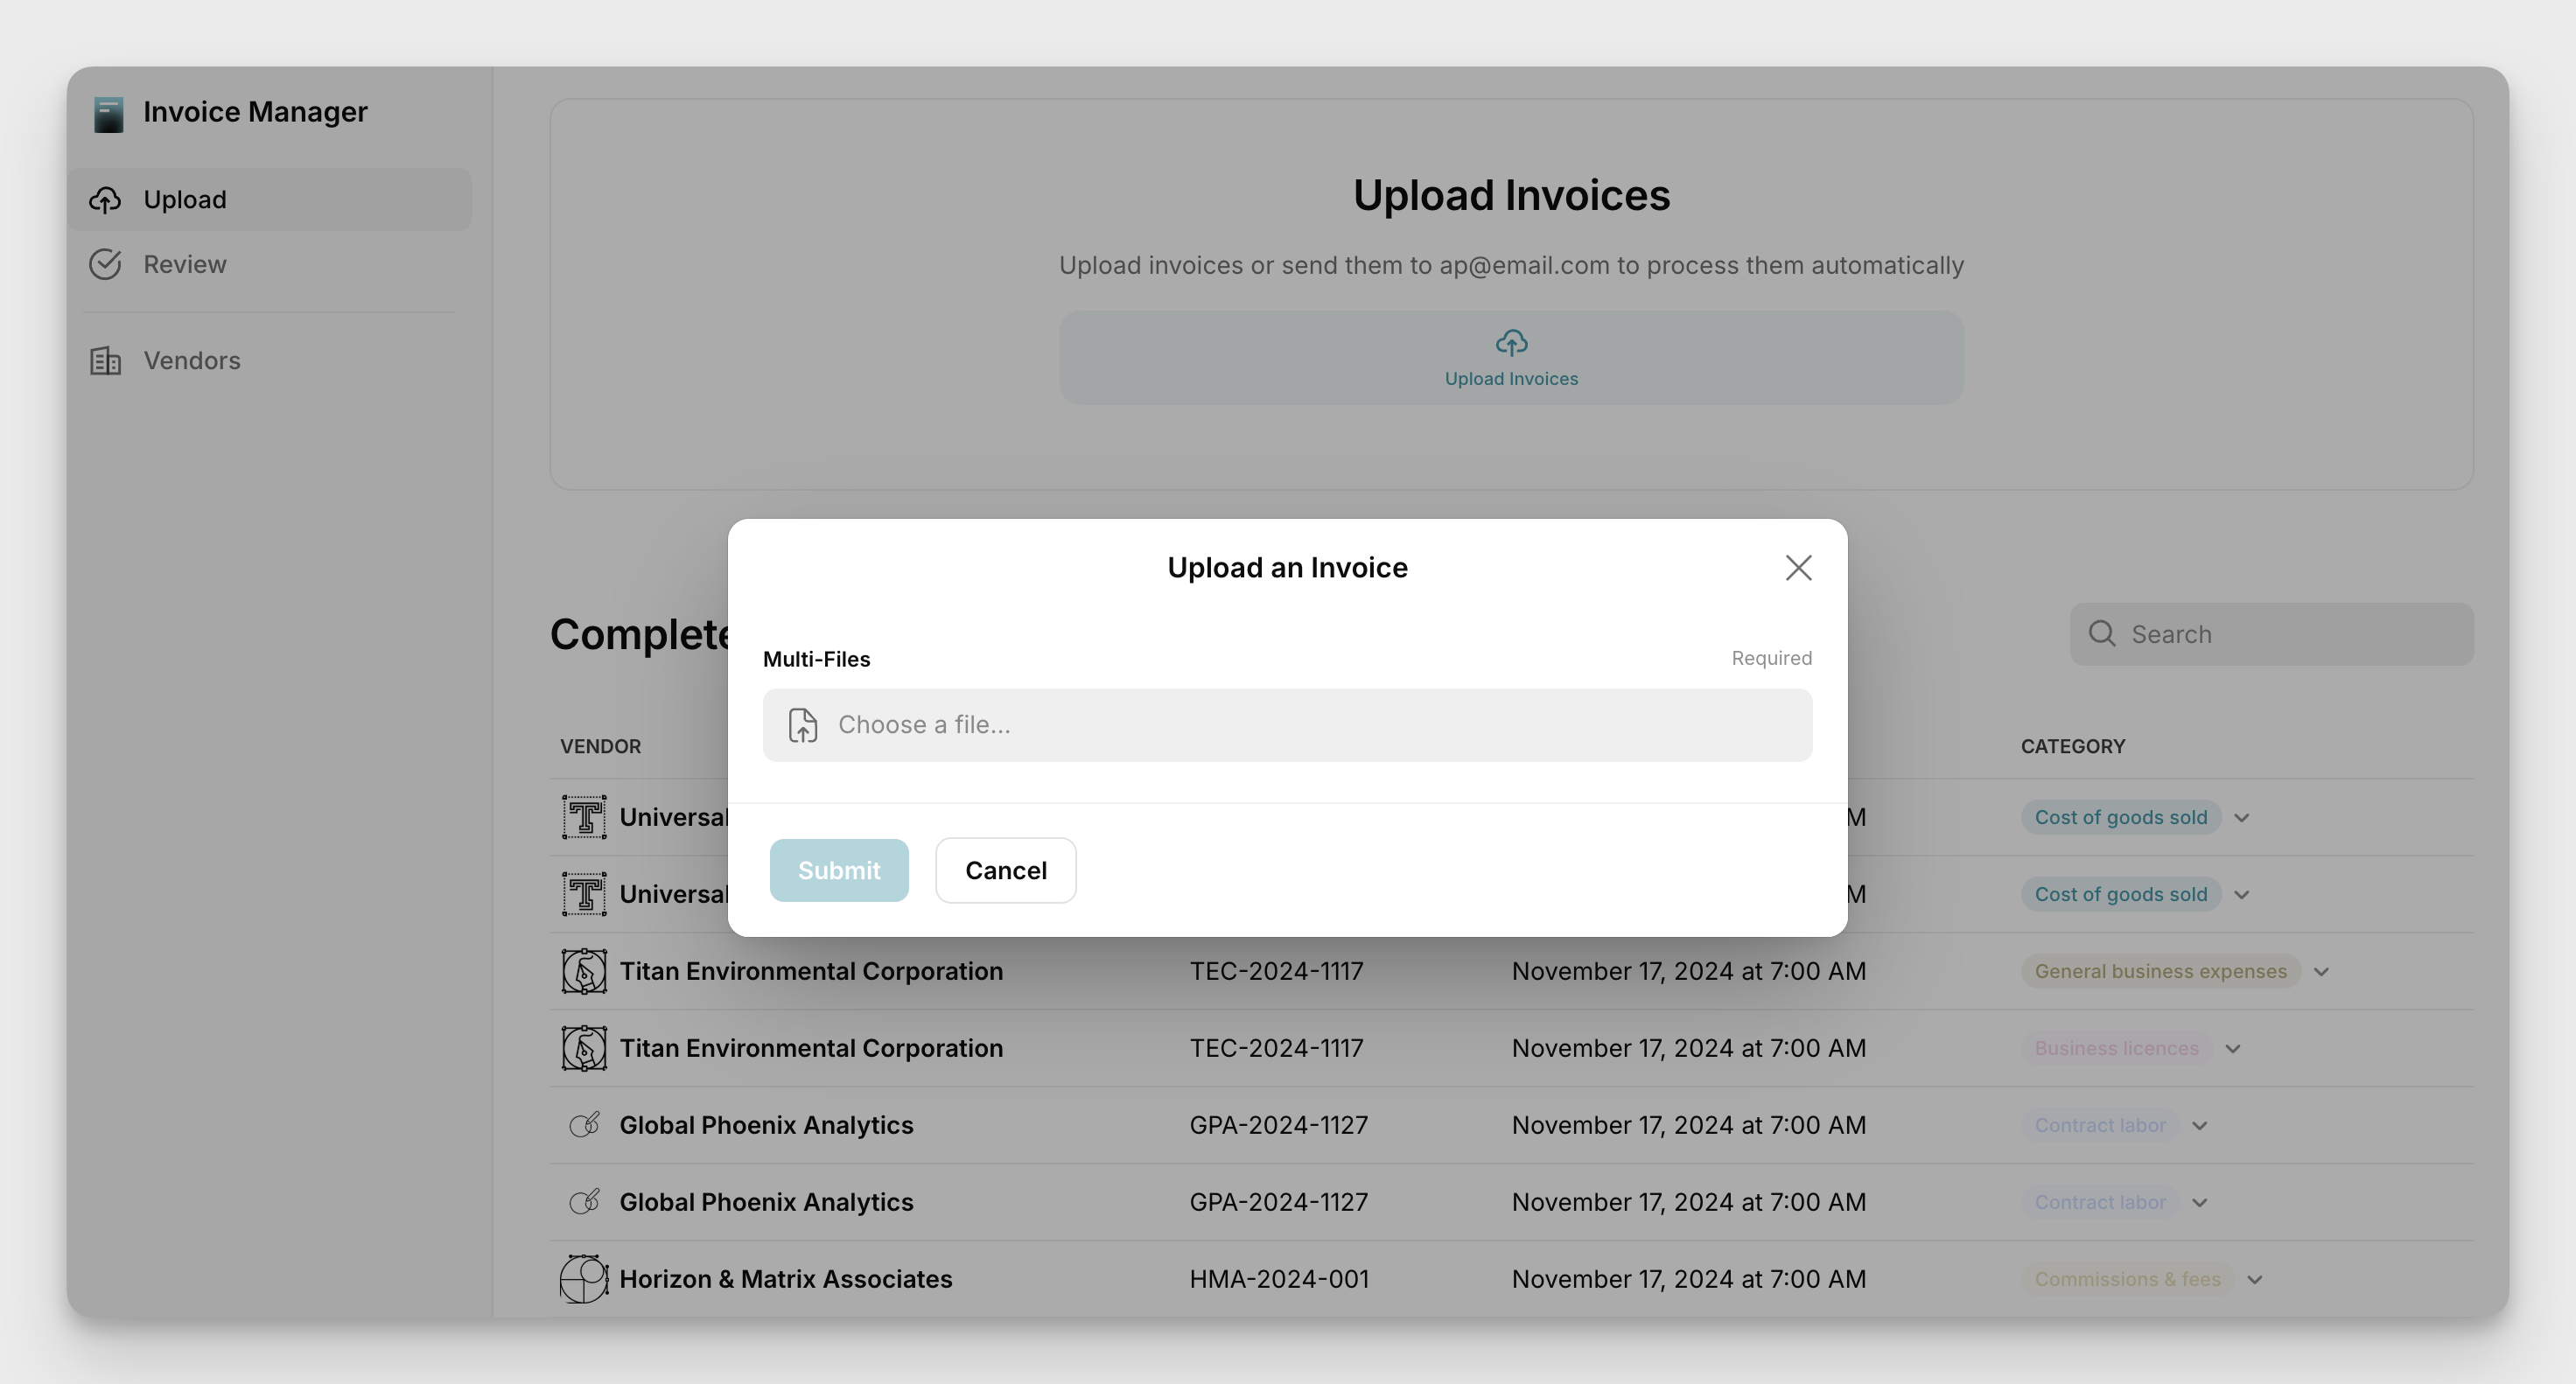
Step 1: Upload your invoices

There are two ways to add invoices to the AI agent:
Upload files in PDF, DOCX, DOC, JPEG, or PNG formats
Forward emails with attached invoices to a connected inbox
To upload files, log in to the Invoice Manager and click on the “Upload Invoices” button on the Process screen. You can choose to upload a single file or batch upload multiple files to process them in one go.
You can also use AI to automatically extract data from a photograph of a paper invoice—like those sent by fax or snail mail—by capturing a photo with your smartphone or iPad. The AI will use optical character recognition (OCR) technology to extract the information and then process it like any other file.
You can also link a specific email address (or addresses) to your AI agent and the agent will automatically pull invoices from attachments. You can either give out a specific email address for clients, contractors, and businesses to send invoices to, or simply forward any invoices you receive to that specific email address. If you want to separate invoices by team, simply set up an email for each separate team.
Step 2: Let the Invoice Manager analyze the invoices

Once your invoices are uploaded, the AI agent extracts the important details, including:
Vendor name
Invoice numbers
Invoice date and due date
Category of services or products
Line items
Total invoice amount
If there are any errors or mismatches in the data extraction—maybe a vendor isn’t in your system or an invoice date is missing—the AI agent flags the invoice with an error message describing the issue. Click on the flagged invoice to check the extracted data and fix the error.
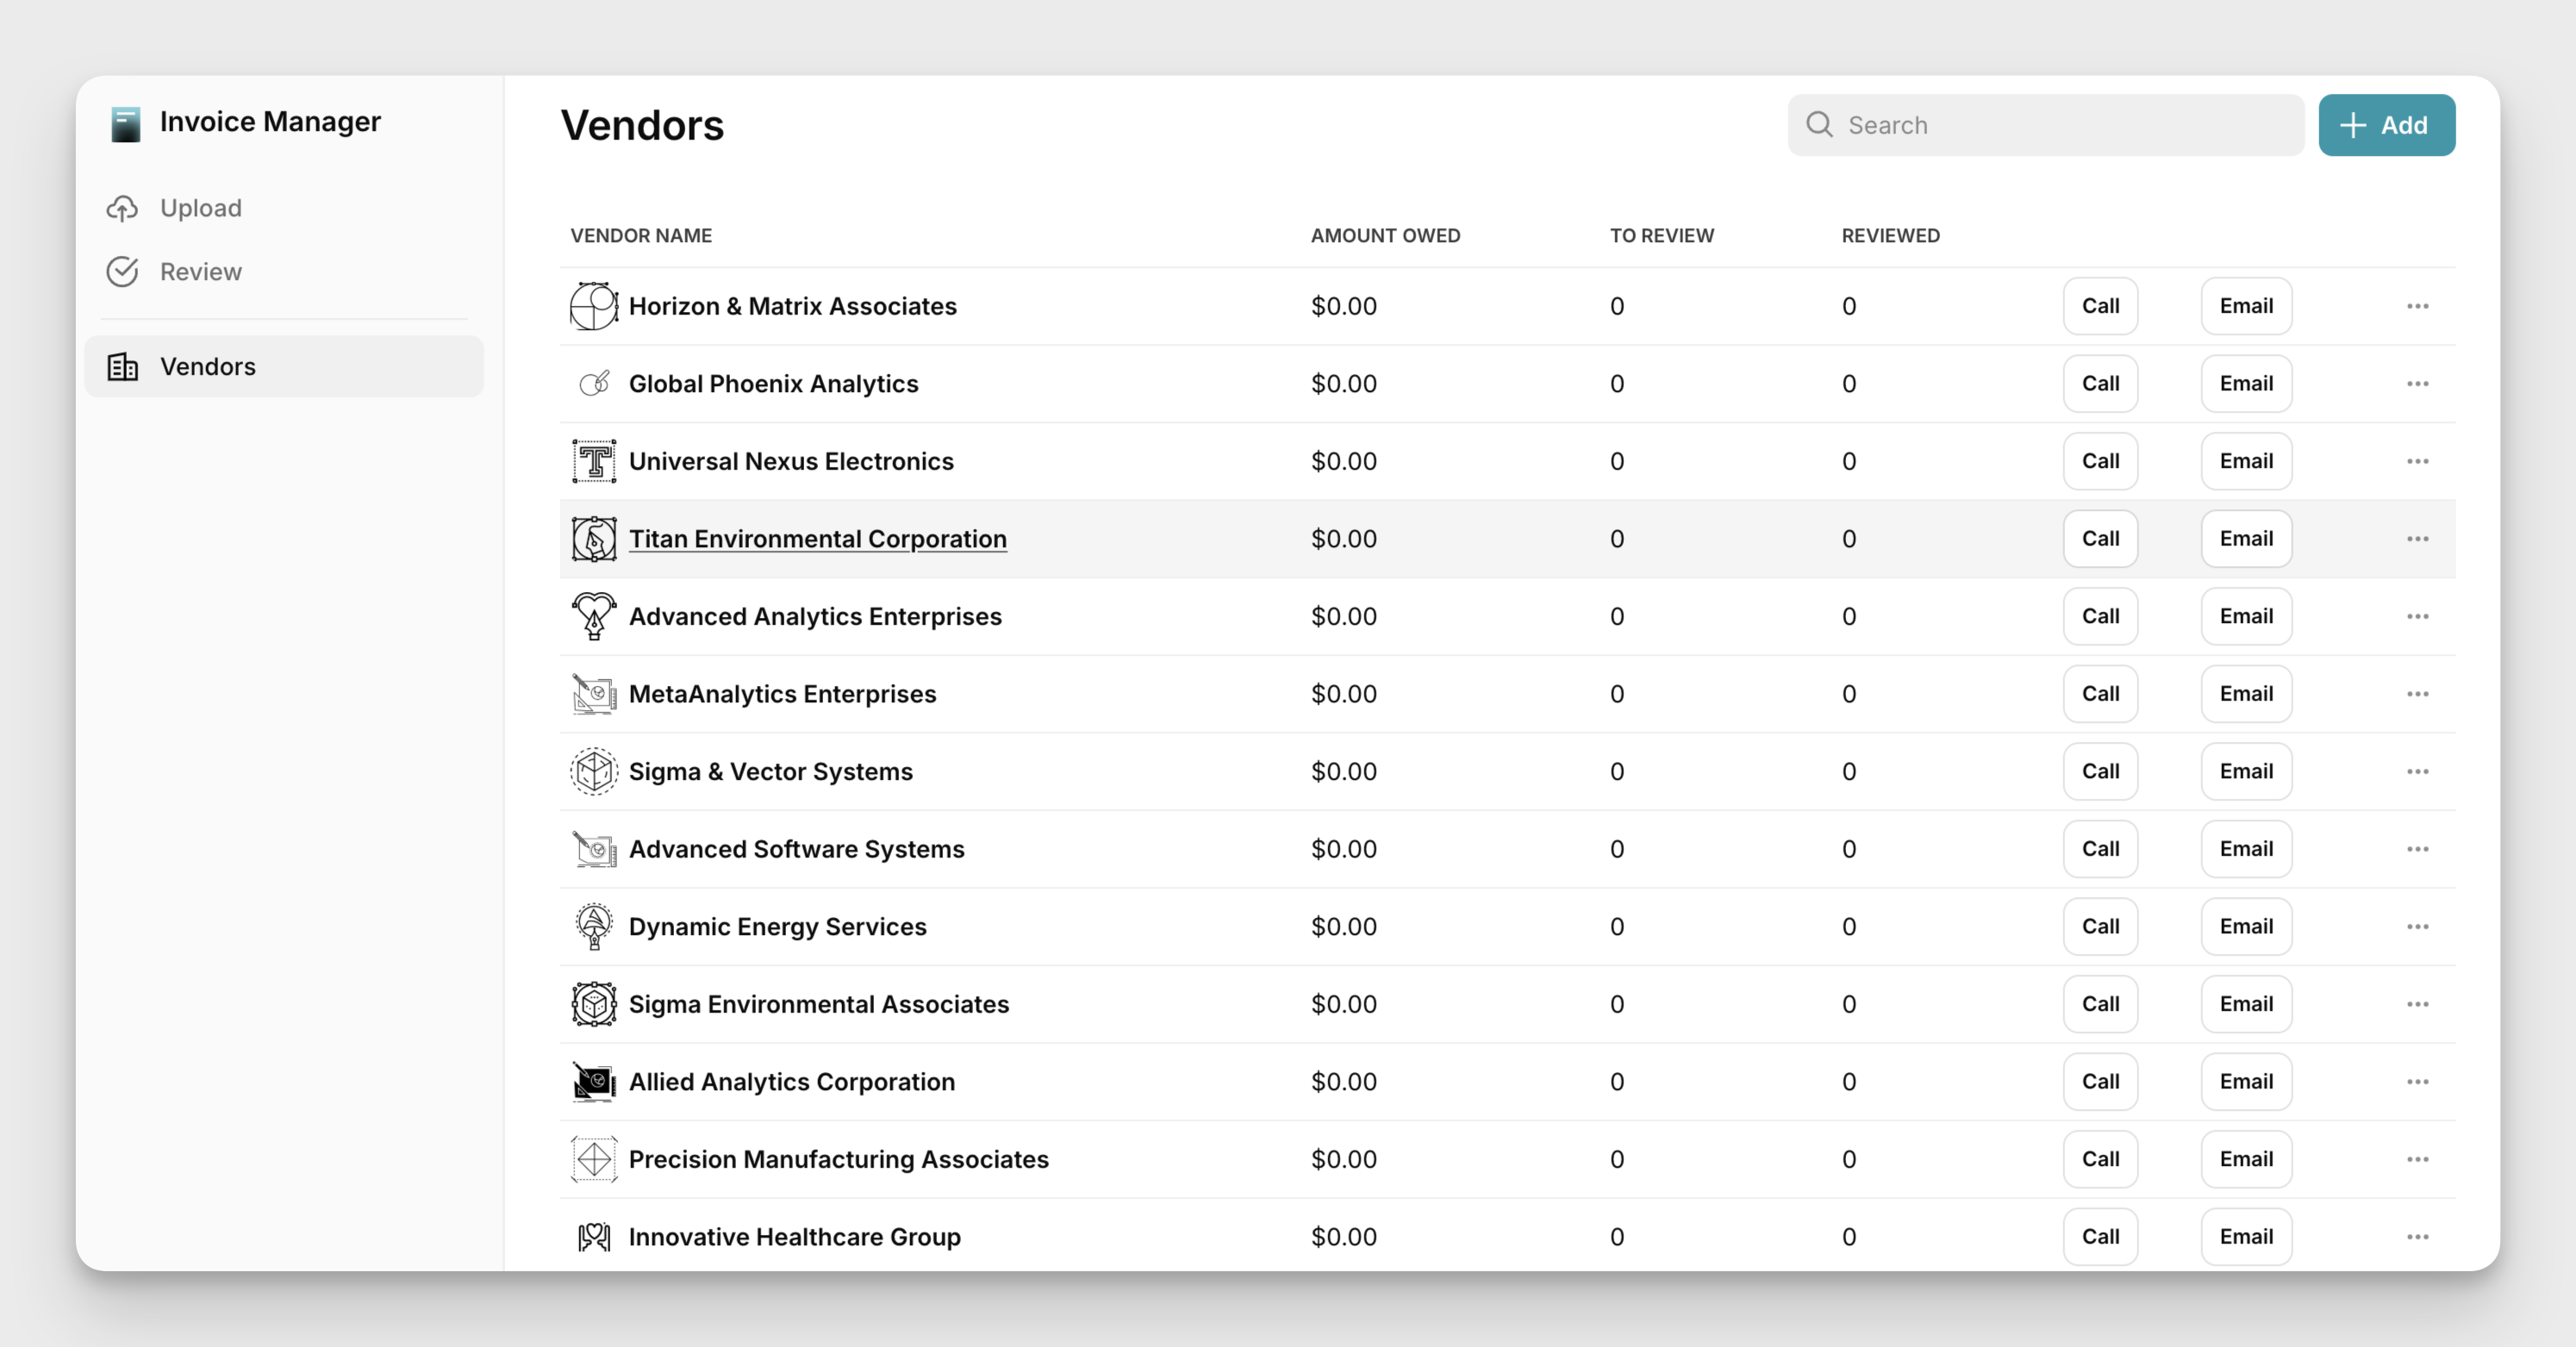
For example, if an invoice is flagged because the AI couldn't locate the vendor, click on it and then use the “Search Vendors” button to look up existing vendors or the “+ Add New Vendor” button to add their details and move the invoice to the review step.
Invoices that are processed without any errors are ready for approval. They're moved to the table titled “Completed” on the Process screen.
Step 3: Review and verify the invoices

Next, head to the Review screen, where you’ll see two tables:
Needs Review: Lists newly processed invoices waiting for your approval
Sent: Lists invoices that are already reviewed and sent to your accounting software
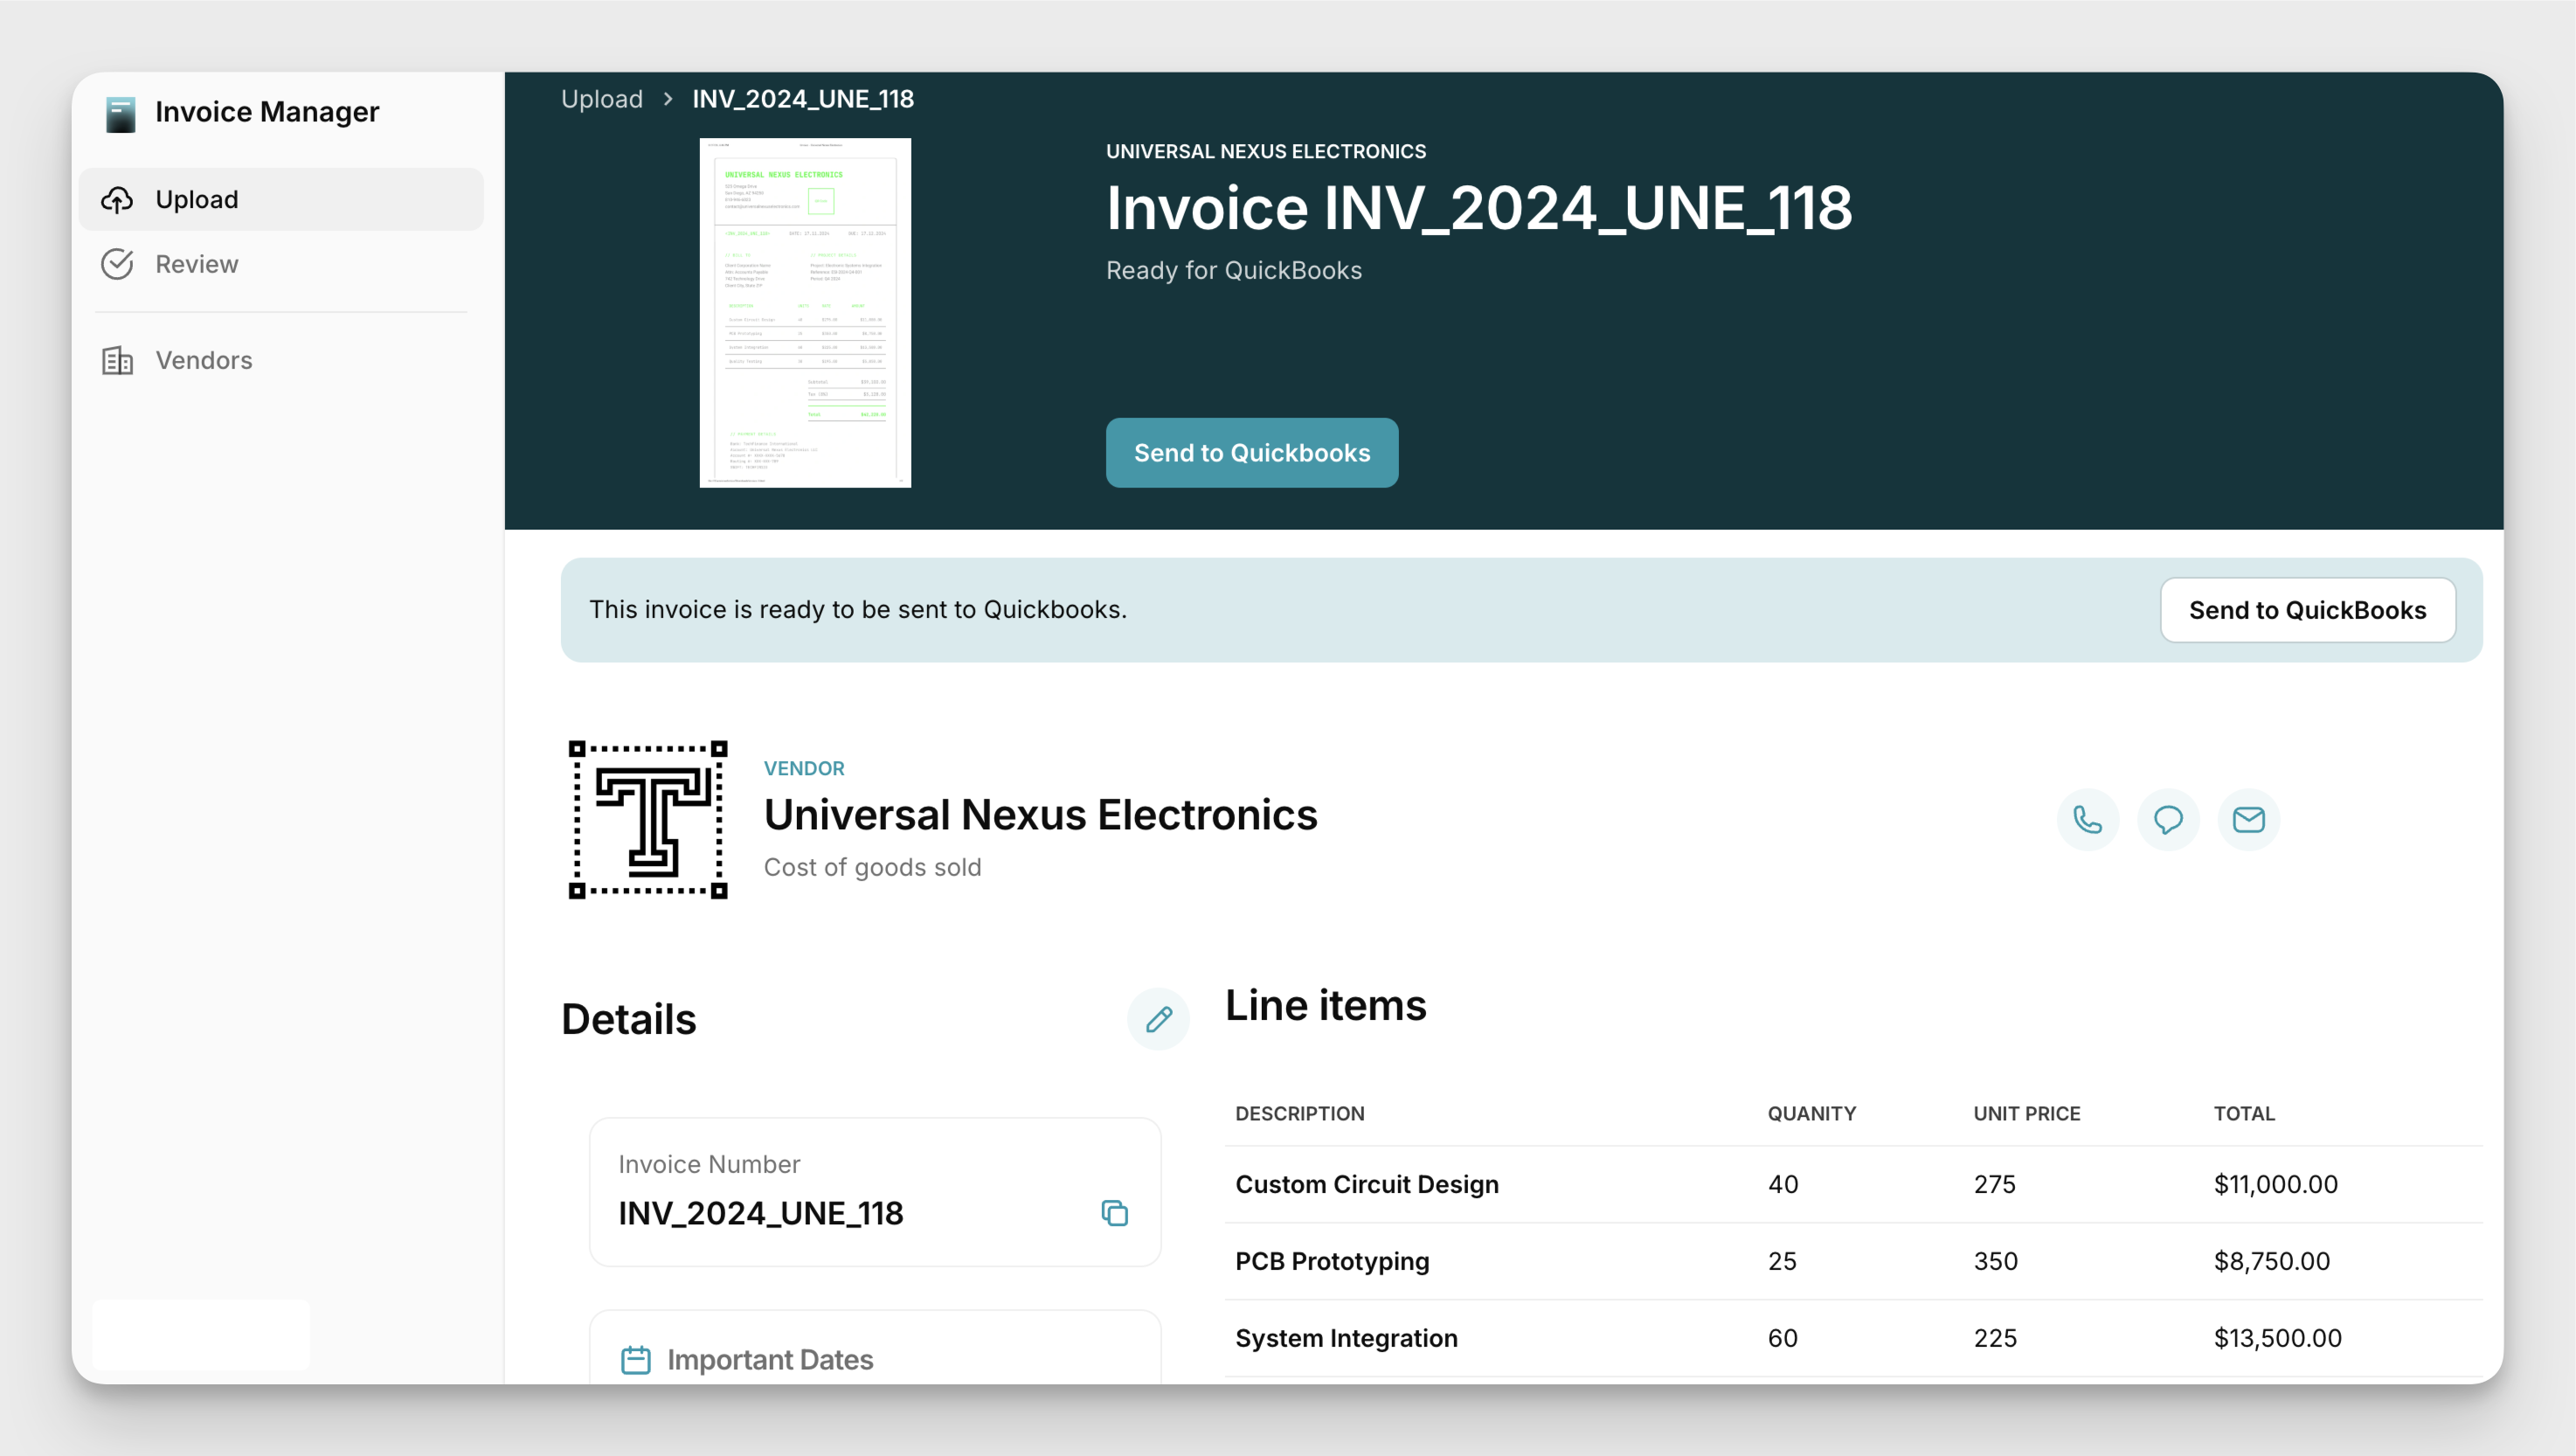
Click on an invoice from the “Needs Review” table to see all the extracted data clearly labeled and organized. You can also view the original invoice below the extracted data and easily cross-check the details. If something doesn’t look right, you can make edits directly from this screen.
Step 4: Push approved invoices to your accounting software

After you’ve reviewed and verified the details, your invoice is ready to send to your accounting software or ERP system. You can do this from three screens:
Extracted invoice data screen: Click on the “Send to [Platform Name]” button below the invoice number at the top of the screen.
Review screen: Click on the “Send to [Platform Name]” button next to the invoice in the “Needs Review” table.
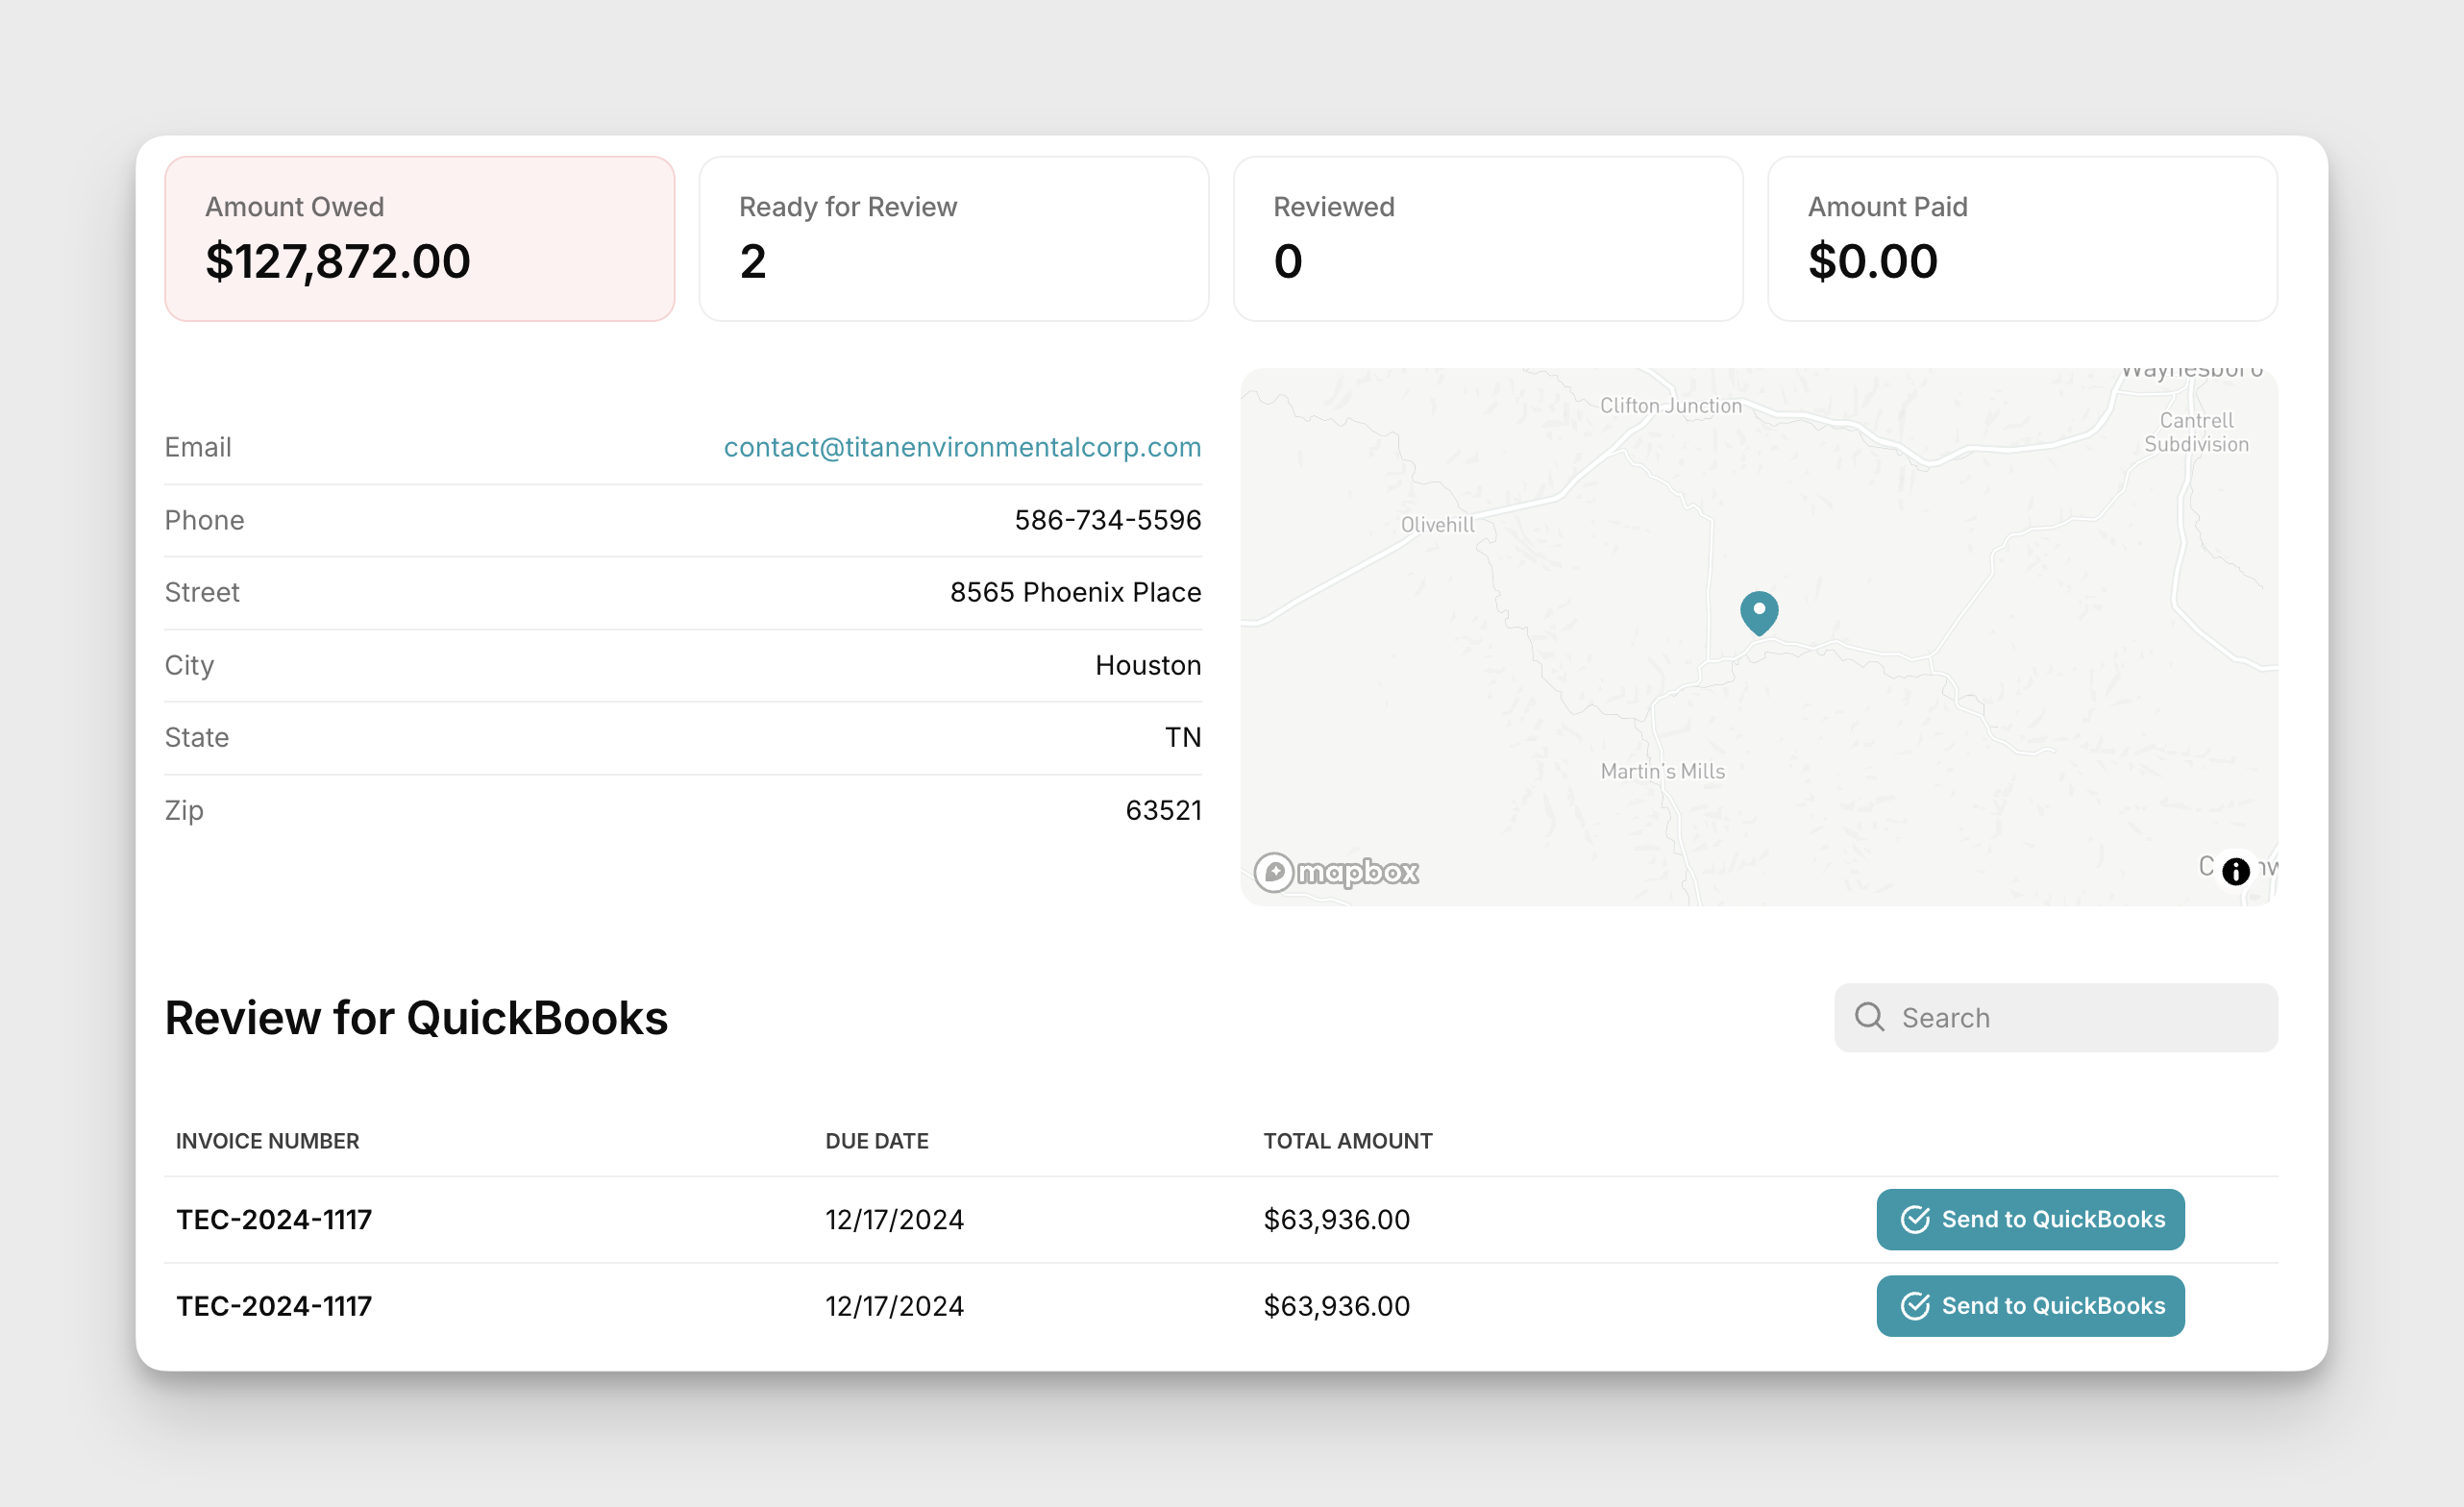
Vendor details screen: Click on the “Send to [Platform Name]” button in the table at the bottom of the screen.

Get an AI invoice manager
Automate your invoice processingHow the Invoice Manager works with your existing systems
The Invoice Manager acts as a partner to your accounting software and whatever other tools you use to manage contracts, pay bills, and organize work. It steps in to handle the time-consuming parts of invoice processing and works alongside the tools you already rely on. All your data stays accurate and organized without your team drowning in hundreds of invoices.
Integrates with your existing accounting software
The Invoice Manager AI agent connects easily with your existing accounting systems, whether that’s QuickBooks, FreshBooks, Zoho, or whatever your business runs on. You get the benefits of automation—faster processing times, more accurate data, a streamlined workflow—without abandoning the tools you already trust and use every day.
Many AI invoice processing tools require you to buy the whole package. It means adopting an entirely new accounting system, retraining your team, and hoping the new tool can handle everything you need. But if your current setup works for you, there’s no reason to ditch it. The AI agent works as an automation solution to handle manual data entry and validation. Your team continues to handle the other parts of the accounts payable process without overhauling your entire system.
Exchanges essential information with your existing accounting system
The Invoice Manager and your accounting software share information so that the data in both tools always matches. Here's the data the tools exchange.
Vendor details: Your current vendor list is loaded when setting up the AI agent. After that, the AI flags any new vendors it spots on invoices, so you can add them easily. Changes made to vendor details in the Invoice Manager—whether adding a new vendor or updating an existing vendor’s details—automatically sync to your accounting system.
Invoice details: Once your team approves an invoice, the Invoice Manager automates entering all extracted data—like invoice number, amounts, due dates, categories, and line items—into your accounting software. It links the invoice to the correct vendor and automatically updates their transaction history in QuickBooks or whichever software you use. Your team doesn’t have to handle manual data entry or match invoices to vendors themselves.
Categories of goods and services: The AI agent uses the same categories from your accounting system to classify goods and services on invoices. This keeps your records consistent and reduces errors during payment processing and audits.
Connects to your email inbox(es)
You can connect one or more email inboxes to the Invoice Manager to automate uploading invoices. When your team forwards an invoice to this inbox, it’s instantly added to the AI agent and processed. There’s no need to waste time downloading and uploading files manually.
For example, you could set up a general inbox like “ap@yourdomain.com” for all invoices. Or, if it makes sense for your company, create separate addresses for different teams or projects, like “marketingAP@yourdomain.com,” “salesAP@yourdomain.com,” or “projectname@yourdomain.com” and link each one to the AI agent.
You can set up filters in your team’s email to take automation further and create a faster invoice processing workflow. These filters can look for things like attachments or keywords such as “invoice” and automatically forward those emails from specific vendors to the connected inbox. The process works 24/7, moving invoices straight from your team’s email to the AI agent without any manual effort.
Use automated invoice processing to give your team more time back
After you’ve processed your first batch of invoices, help your team work the Invoice Manager into their routines. Encourage them to upload files or forward invoices to the connected inbox as soon as they receive them. With automated invoice processing, your team won’t need to track each one manually—they can simply check the tool a couple of times a week to make sure everything is running smoothly. By taking care of the time-consuming tasks like data entry, data validation, and flagging errors, the AI frees your team to focus on more impactful work, like managing project budgets or supporting strategic planning.
AI agents don’t have to work in isolation—you can connect them to one another and address other bottlenecks in your workflow. For example, a contract manager could automatically send details for new contracts to the Invoice Manager. This integration would allow the contract manager to create vendors directly in the Invoice Manager, streamlining the process even further
Get in touch with Glide to see how automated invoice processing can save your team hours each week.
Automate your invoice processing
Get an agent
Shivani Shah is a writer, editor, and content marketing consultant who likes to make complex ideas easy to understand. She believes in "show, not tell" and works with B2B tech companies, helping them highlight how their products can solve customer problems. Her areas of expertise include community management and data privacy.


