Eva Živanovič is a Certified Glide Expert with over a decade of experience in e-commerce and tech. Her area of expertise is in automation and building efficiency solutions that reduce manual effort for businesses. It's not surprising that she was one of the first adopters of Workflows when Glide launched them in Beta. Here, she shares some real life examples of how she's used Workflows for her clients. If you're interested in enlisting help automating your business, she can be found at zikisolutions.com.
-
Over the past decade, automation has become a cornerstone of modern business operations, helping companies cut down on manual work, make smarter decisions, and reinvest their time in high-impact activities that drive better results and strengthen their bottom line—all while keeping employees and clients happy.
The best part is that automation just keeps getting smarter and smarter. With the integration of artificial intelligence capabilities, Intelligent Automation (IA) takes things to a whole new level. Entire processes can now run from start to finish with minimal human input, delivering even greater efficiency and impact for businesses. Glide’s new Workflows are a perfect example of this evolution.
In a recent blog post, Glide already explored the benefits of Intelligent Automation (IA) in depth. This article is about taking it a step further—moving from theory to practice. We’ll dive into real-world examples of how you can use Glide’s Workflows to automate your business - all without writing a single line of code. We’ll walk you through the most impactful updates and show you exactly how to use them to make both your business and your life a whole lot easier.

Watch Eva's live event on workflow automation
RSVP hereNew trigger options
Every automation begins with a Trigger - an event that sets the automation in motion. From there, it performs specific actions to help teams save time, improve efficiency, and keep them focused on what matters most.
Before Workflows, the only way to trigger an automation was through user interaction, like clicking a button or submitting a form. Workflows allow your apps to take action without needing a human to start the process.
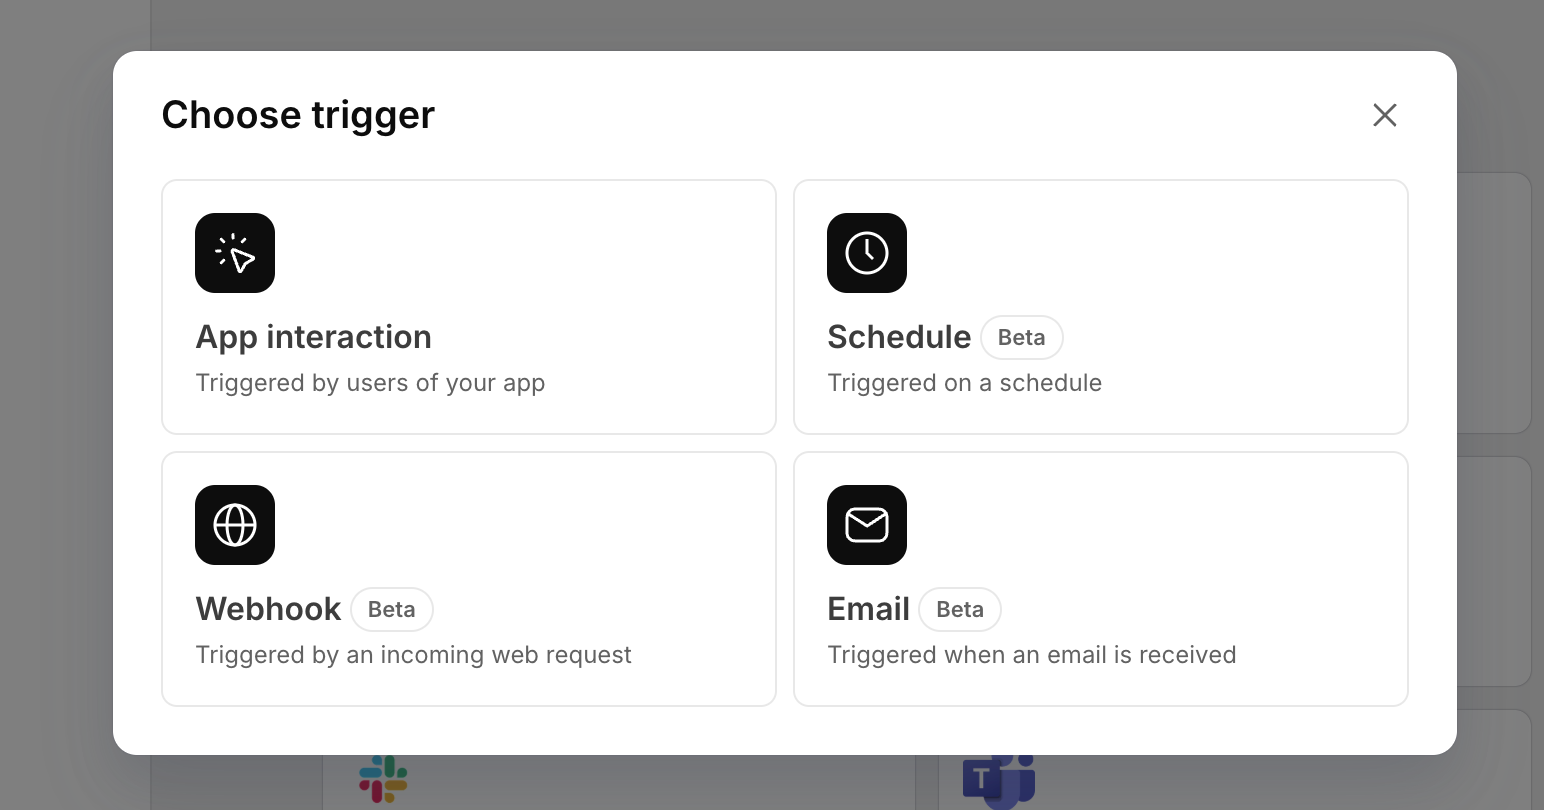
Glide introduced three new triggers (with more on the way!) that allow automations to happen without any (or minimal) user interaction:
- Schedule Trigger: Automations that run at set intervals, like sending weekly reports and reminders or handling routine data processing. Once set up, these triggers take care of everything on their own—no clicks, no manual effort.
- Webhook Trigger: Automations triggered by external events and apps or even other workflows within your Glide app. This makes it easy to connect Glide to external services, sync data in real time, and build scalable, integrated systems.
- Email Trigger: Automations that start when you send an email to a dedicated Glide email address. This trigger is perfect for processing incoming orders, inquiries, or other email-driven data and helps your team turn messy, unstructured content into clean, actionable data in your Glide app.
Adding steps to workflows for more complex automations
In addition to the new triggers, Glide has introduced several features that make building complex, sophisticated workflows easy, intuitive, and accessible. Here are just a few highlights:
- Loops: Loops are incredibly useful for handling scenarios where multiple items need to be processed individually within the same workflow. For example, you can use a Loop to process email attachments, like invoices or contracts. Glide can extract and analyze each attachment one by one, converting data from PDFs or other formats into structured data that fits your app’s tables. Another practical use case is managing overdue tasks. If you have a task management app, a Loop can identify all overdue tasks in your database and perform actions on each one, like sending reminders to the assignees or updating their statuses to reflect the delay.
- Nested Conditions: Nested Conditions let you create advanced decision-making logic within your workflows. Instead of just one condition leading to a single outcome, you can set up branching conditions that depend on additional criteria. For example, you can design a workflow where an action depends on a client’s subscription type and then further splits based on their payment status. This makes your automations smarter and more adaptable to complex processes.
- Computed Steps: Computed Steps let you perform real-time calculations and data transformations directly within your workflows. For example, you can calculate invoice totals from sales lines or restructure data coming from external sources to match your app’s data model—all on the fly. This eliminates the need for external tools or complex database processes, reducing reliance on additional resources. What makes Computed Steps even better is that the computations are executed during the workflow itself rather than in the database backend, improving your app’s performance, making your app quicker, more efficient, and more scalable.
With these new features and triggers, Glide’s Workflows have evolved into one of the most powerful automation engines in the no code space. Many Glide users and experts have already moved significant portions of their automations—previously built on platforms like Make—directly into Glide. And with AI in the mix, you can handle most automations entirely within Glide, making it a one-stop solution for your automation needs.

Introducing Workflows
Learn about Glide's new WorkflowsHow to use Workflows
Once you’re familiar with the building blocks of Workflows, you can begin putting the pieces together to automate tasks within your Glide apps. Here are some ideas for where to start. Below are real-life examples of Workflows I’ve built into apps for clients using each of the three new trigger types.
Schedule trigger use cases
Scheduled triggers let you run automations on a set schedule, making them perfect for managing recurring tasks, sending reminders, and creating automated reporting workflows. Here are just a few examples of how you can use them.
Send weekly reports to stakeholders
Visibility into your key data is essential, but let’s face it—manually pulling numbers from spreadsheets, creating reports, and emailing them is tedious and prone to mistakes. With Glide, you can bring all your scattered spreadsheets into one app and set up an automation to send weekly summaries to your team and stakeholders.
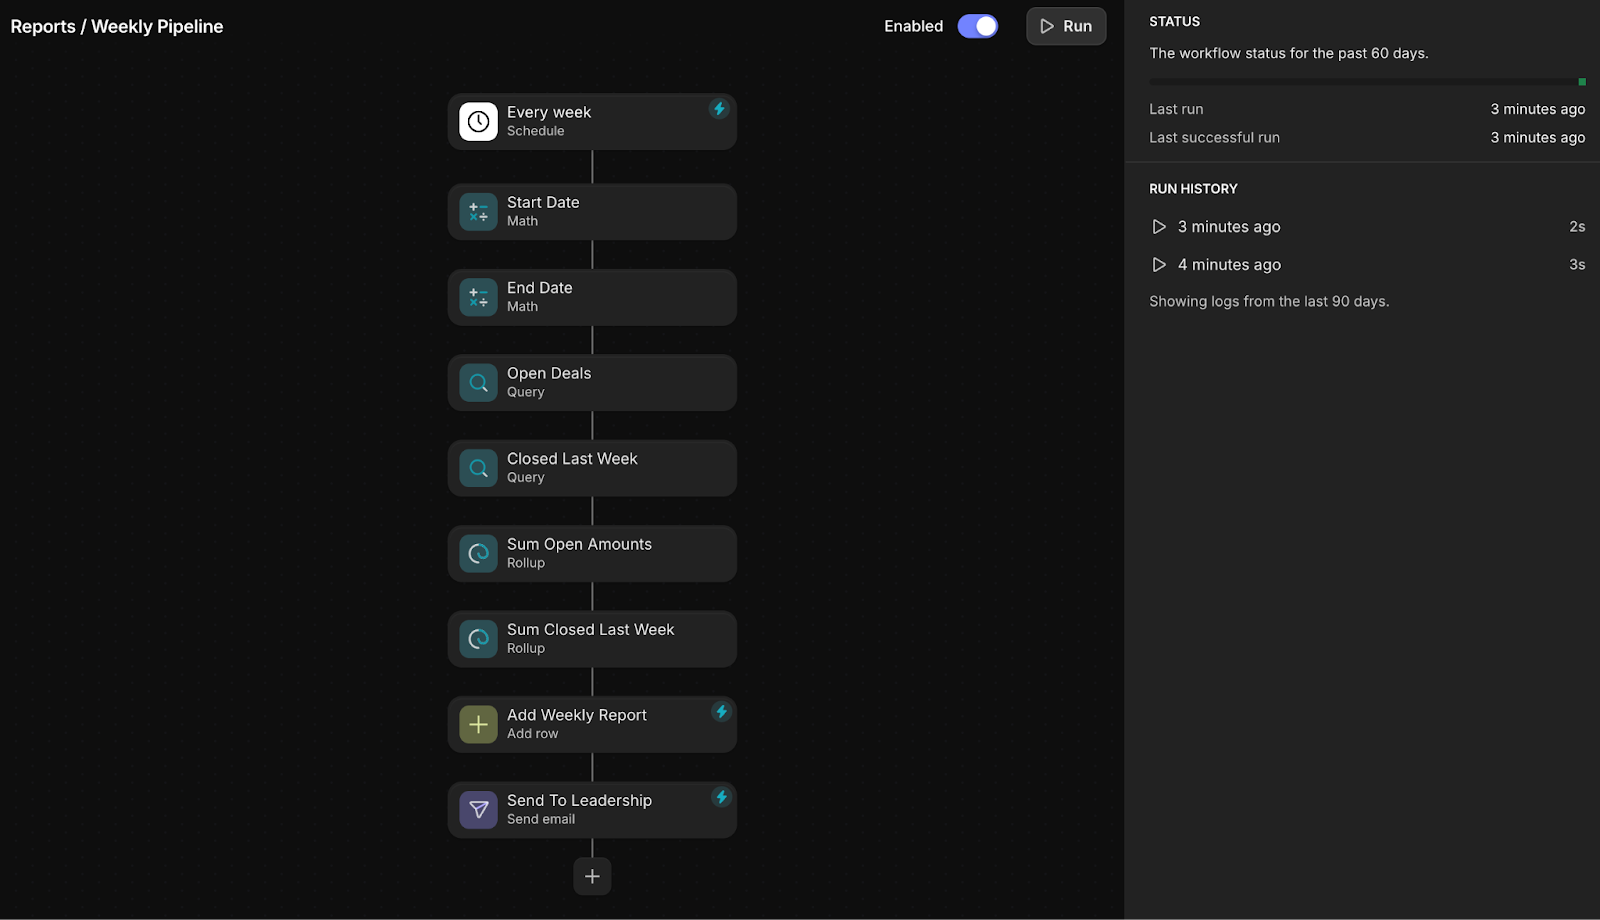
For example, we’ve created an automation that summarizes the open pipeline and closed deals from the past week. Glide takes that data, generates a report, and automatically emails it to leadership. It’s one less thing to worry about, and it ensures everyone stays on top of key metrics and operations, enabling your team to make the right decisions faster.
Send payment reminders
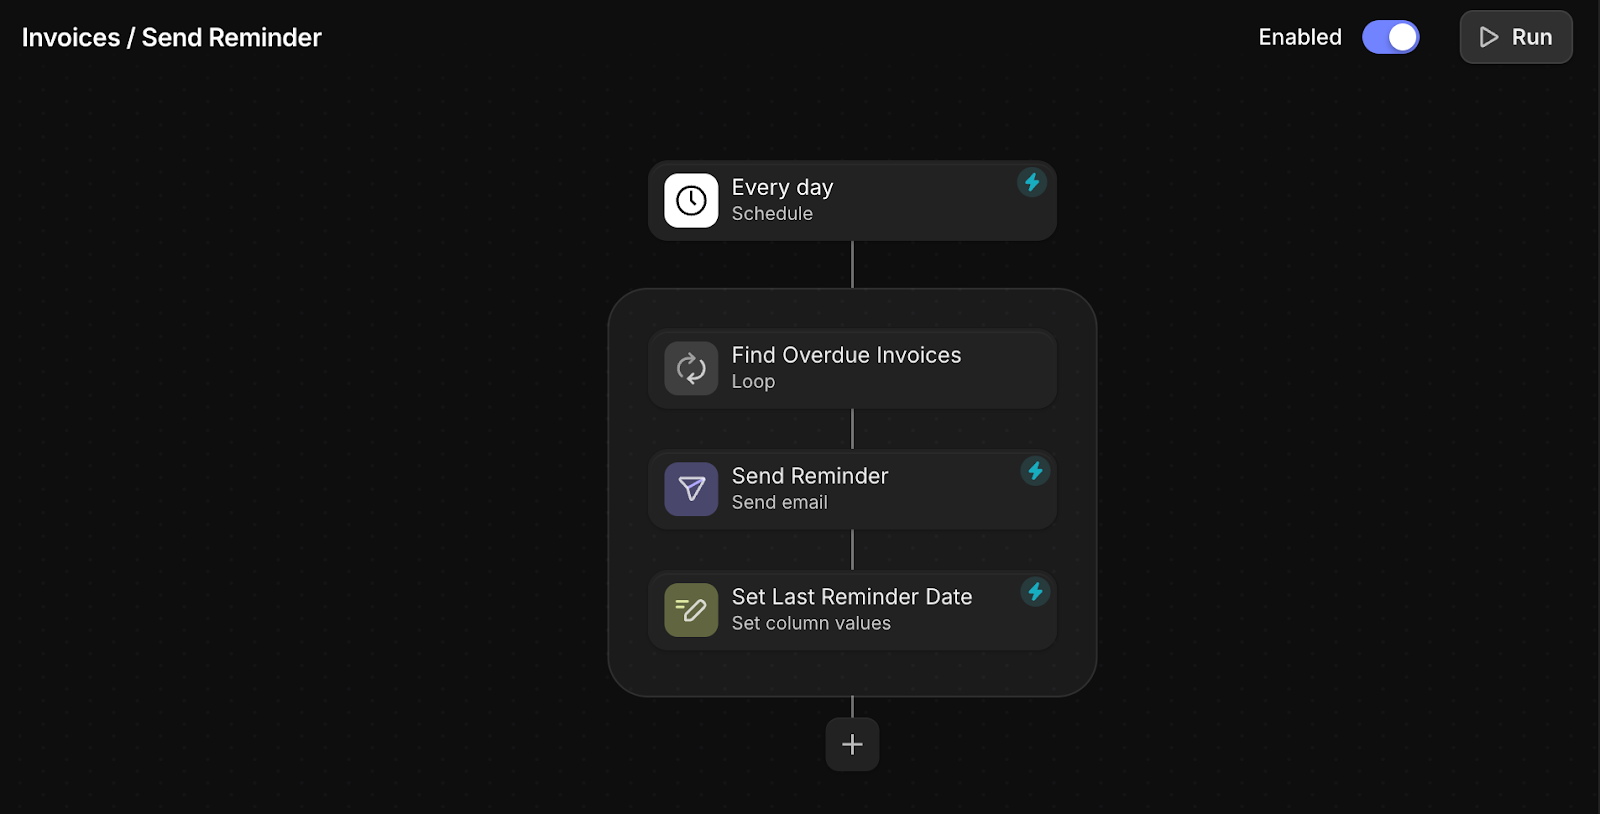
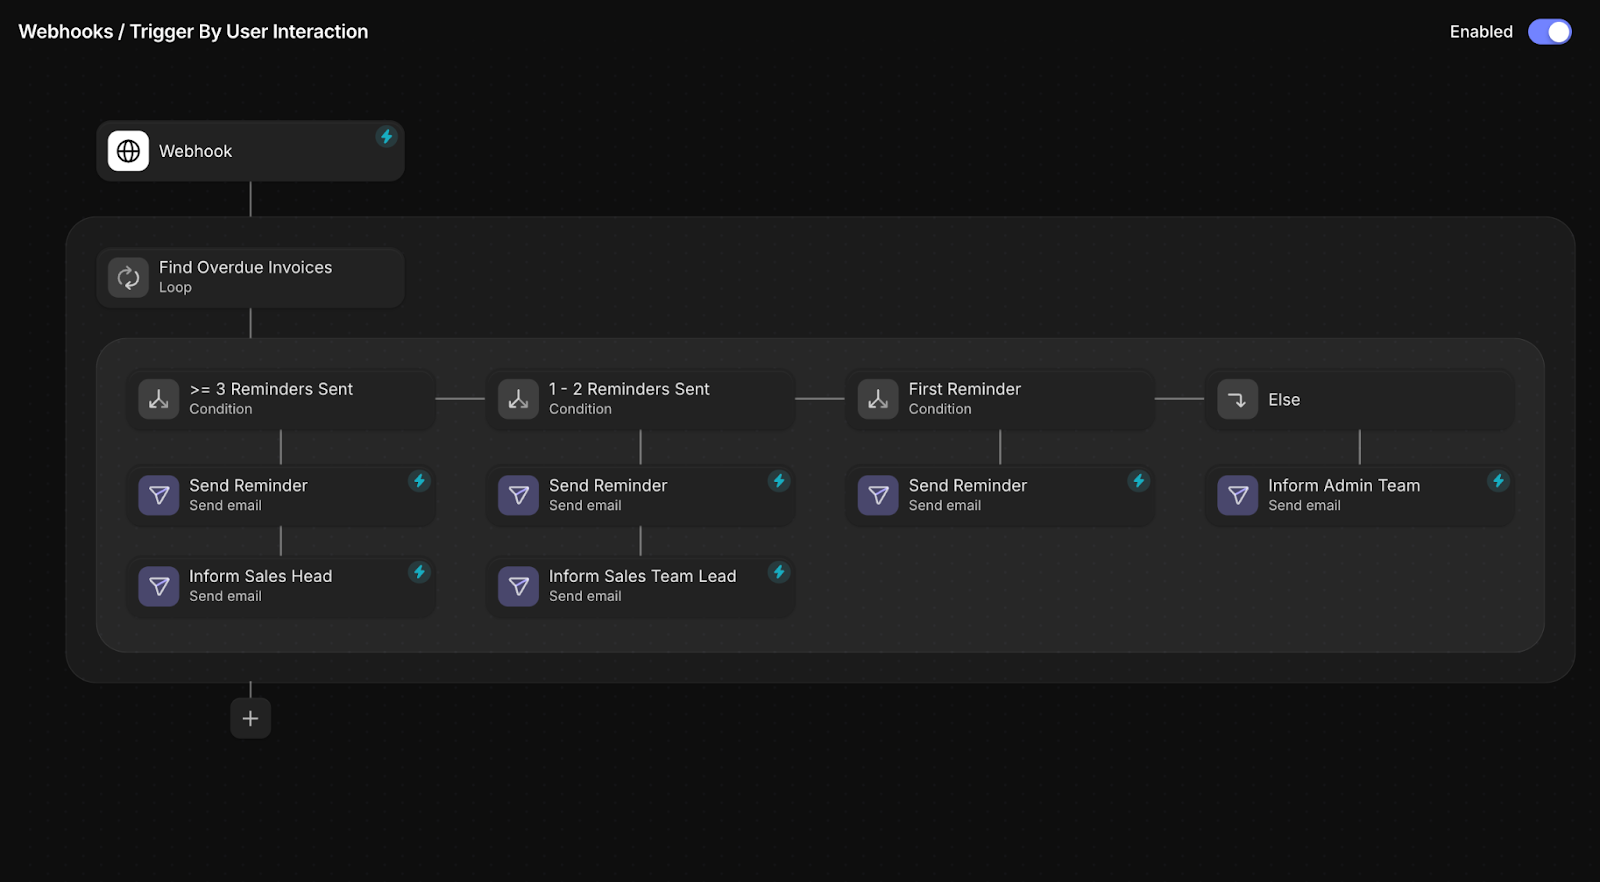
If you’re in the service business, you know how overwhelming it can be to keep up with invoices, delivery dates, and payments. Glide’s scheduled triggers take the pressure off by automating key follow-ups and reminders. For example, you can set up an automation that identifies overdue invoices and emails clients to settle their balances. To avoid overwhelming your clients, you can set up the automation to also add the “Last Reminder Sent” date so reminders only go out at predefined intervals. It’s a simple way to stay organized, keep your clients happy, and ensure steady cash flow.
Schedule recurring activities
If you handle recurring tasks or client services, scheduled automations can take the hassle out of managing them by doing all the heavy lifting for you. If you offer recurring services, and a client signs up for an ongoing agreement, you can set up an automation to automatically create service schedules.
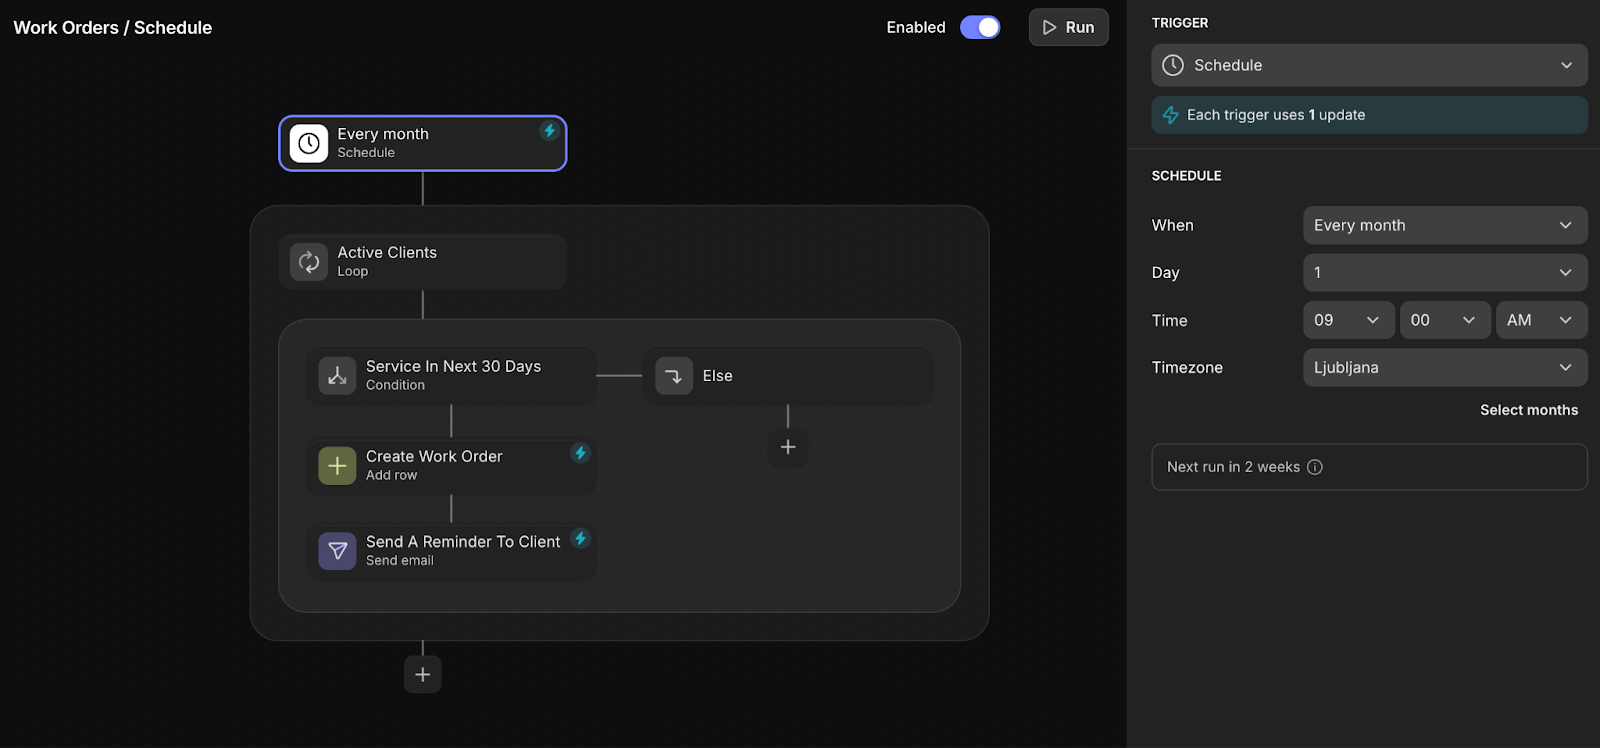
For example, we set up an automation that scans your list of active clients, looks at their next expected service date, and checks if it falls within the next 30 days. If it does, it automatically creates a new record in the “Work Orders” database and sends a notification to the client about their scheduled service. This way, you stay ahead of recurring commitments without manual effort, making sure no service is missed and your team stays organized, and your clients stay happy and well-informed.
Webhook trigger use cases
The Webhook trigger is a great tool for triggering Glide Workflows from external services and ensuring your data stays in sync in real-time. It’s incredibly flexible and can work with any application that allows you to “subscribe” to specific events. It’s important to keep in mind, though, that whether or not you can integrate your external service with Glide Webhooks depends on the capabilities of the service you’re working with.
Webhooks aren’t just limited to external integrations—they’re also a great way to connect one Glide Workflow to another. This makes it possible to create modular and reusable automations, where complex workflows are broken into smaller, manageable parts that work together smoothly. By doing this, you can build systems that are easier to manage, scale, and adapt to your needs.
Automatically sync document signatures to Glide
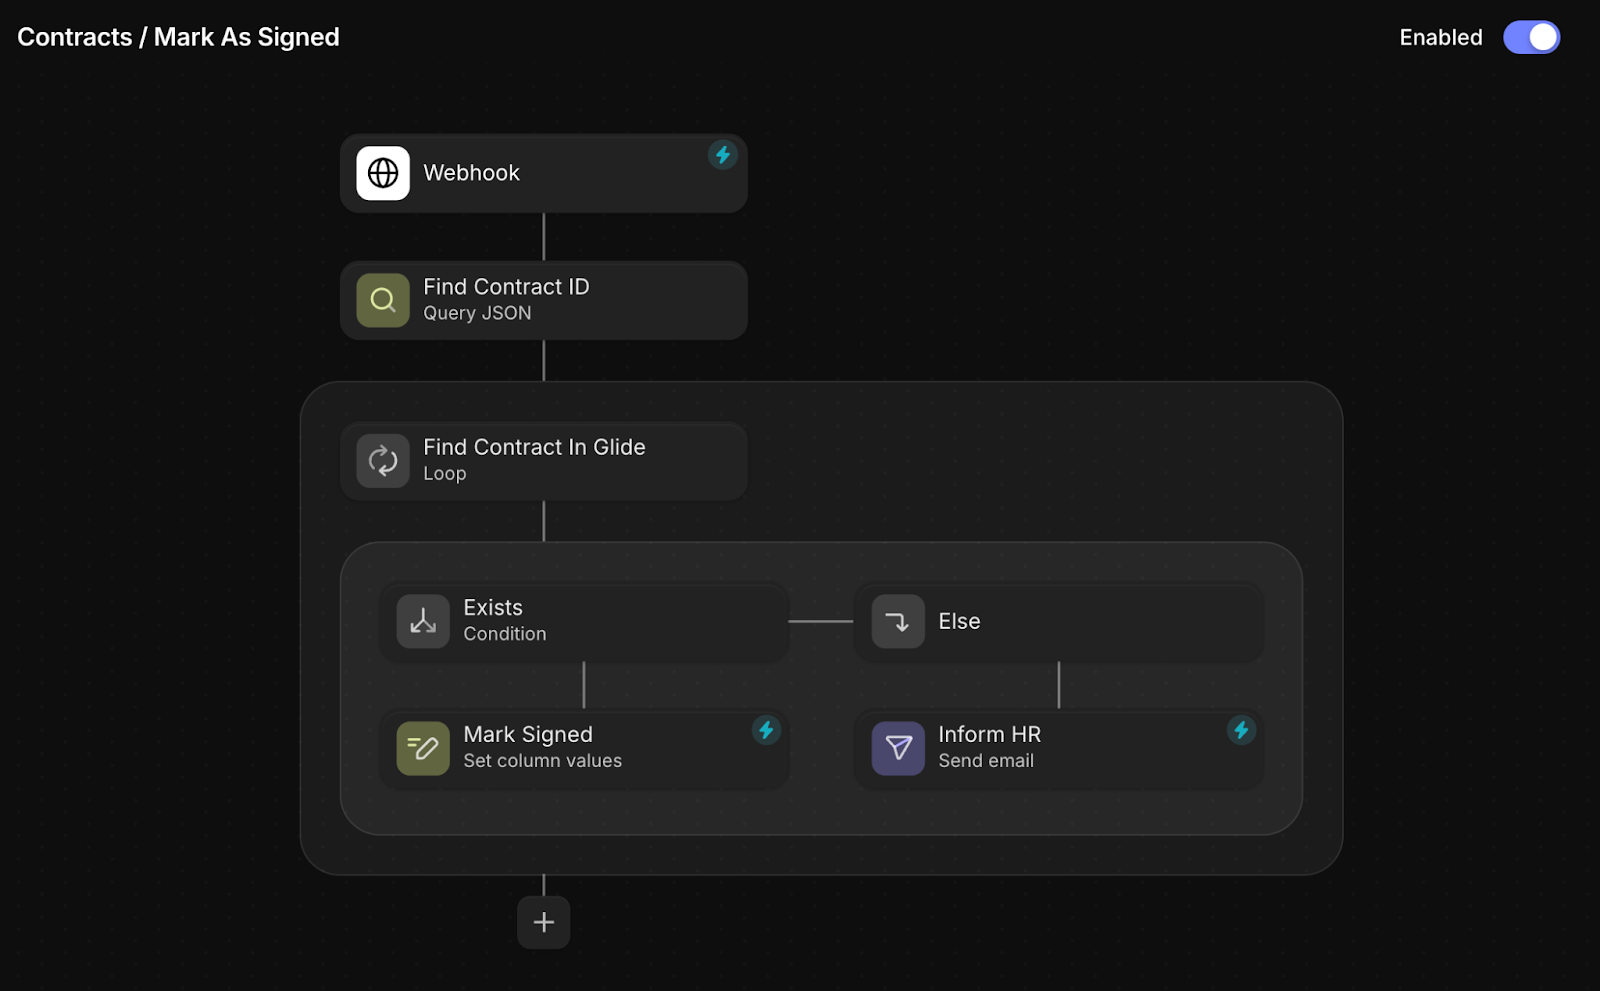
Using webhooks, you can integrate Glide with services like PandaDoc to track document signatures. In our example, we’re listening for contract signature events. When a new employee signs an employment contract, PandaDoc sends the details—including the contract ID—to our Glide webhook. Glide uses the Query JSON action to extract the ID of the contract, finds the matching record in the Contracts table, and updates its status to “Signed.” If something doesn’t match, the automation notifies HR to review and fix the issue manually. This way, your HR team only needs to step in if something goes wrong instead of spending time constantly monitoring the process.
Add Shopify orders to Glide
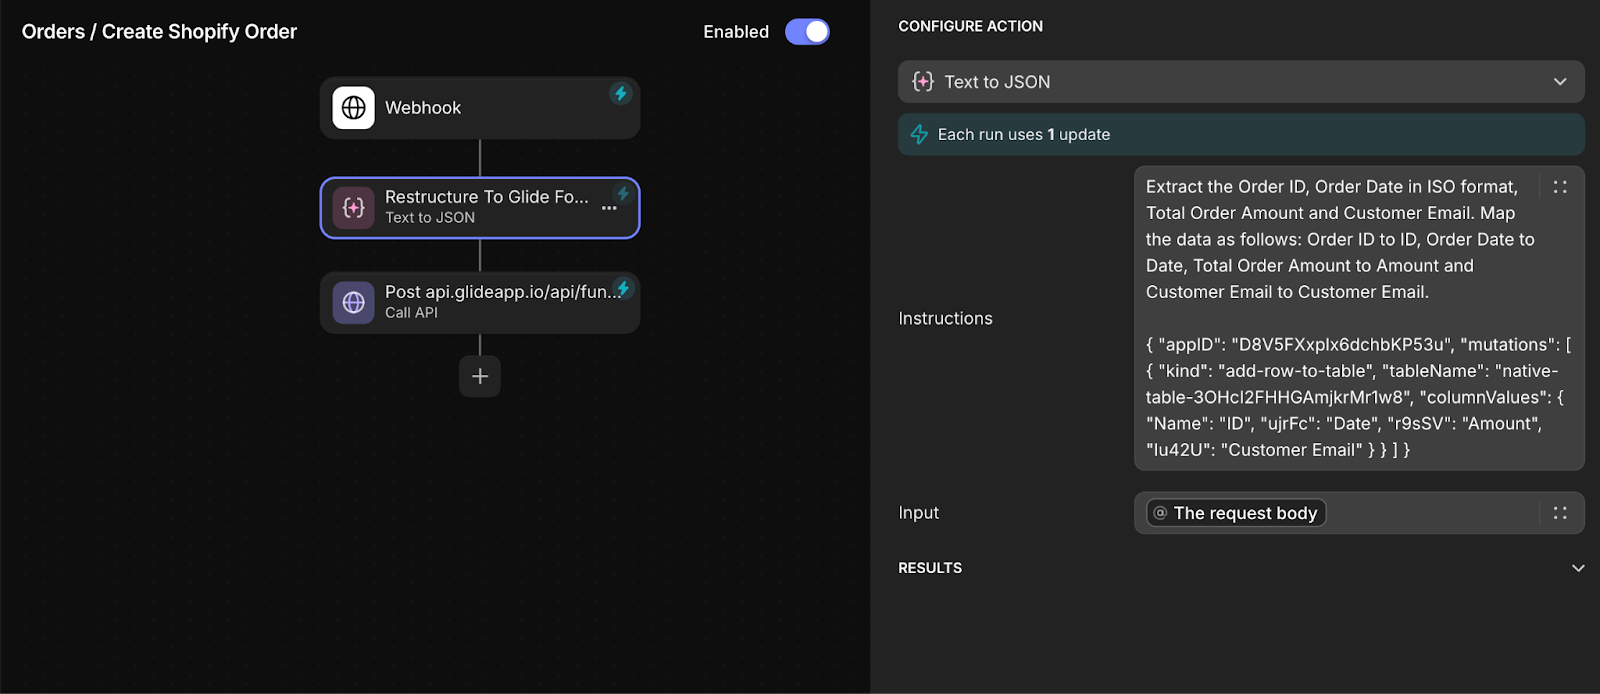
If you run an online store with Shopify, syncing your orders with Glide can simplify managing your business and reporting on key metrics from a centralized location. By subscribing to events in Shopify and linking the subscription to a Glide Webhook, Shopify can automatically send new order details—such as order ID, customer information, and purchased items—directly to Glide. With Glide’s Query JSON action, you can process and restructure this data to a format that Glide understands and add it to your Orders table.
From there, you can automate additional workflows, like notifying your fulfillment team, updating inventory levels, or sending confirmation emails to customers—all without any manual interaction. This setup keeps your operations efficient and ensures everything runs smoothly, making it easier to focus on growing your business.
Use a User Interaction trigger to trigger another Glide workflow
Currently, user-based triggers don’t yet offer all the functionality available with other workflow triggers. Glide is actively working to bridge this gap, but in the meantime, webhooks provide a great workaround.
For example, you can set up a user-based action using a call API module to trigger your Glide webhook that acts as the starting point for another Workflow in your app. Since workflows with webhook triggers support additional features like looping, this setup allows you to unlock all the advanced functionality of workflows, even when starting with user-based actions.
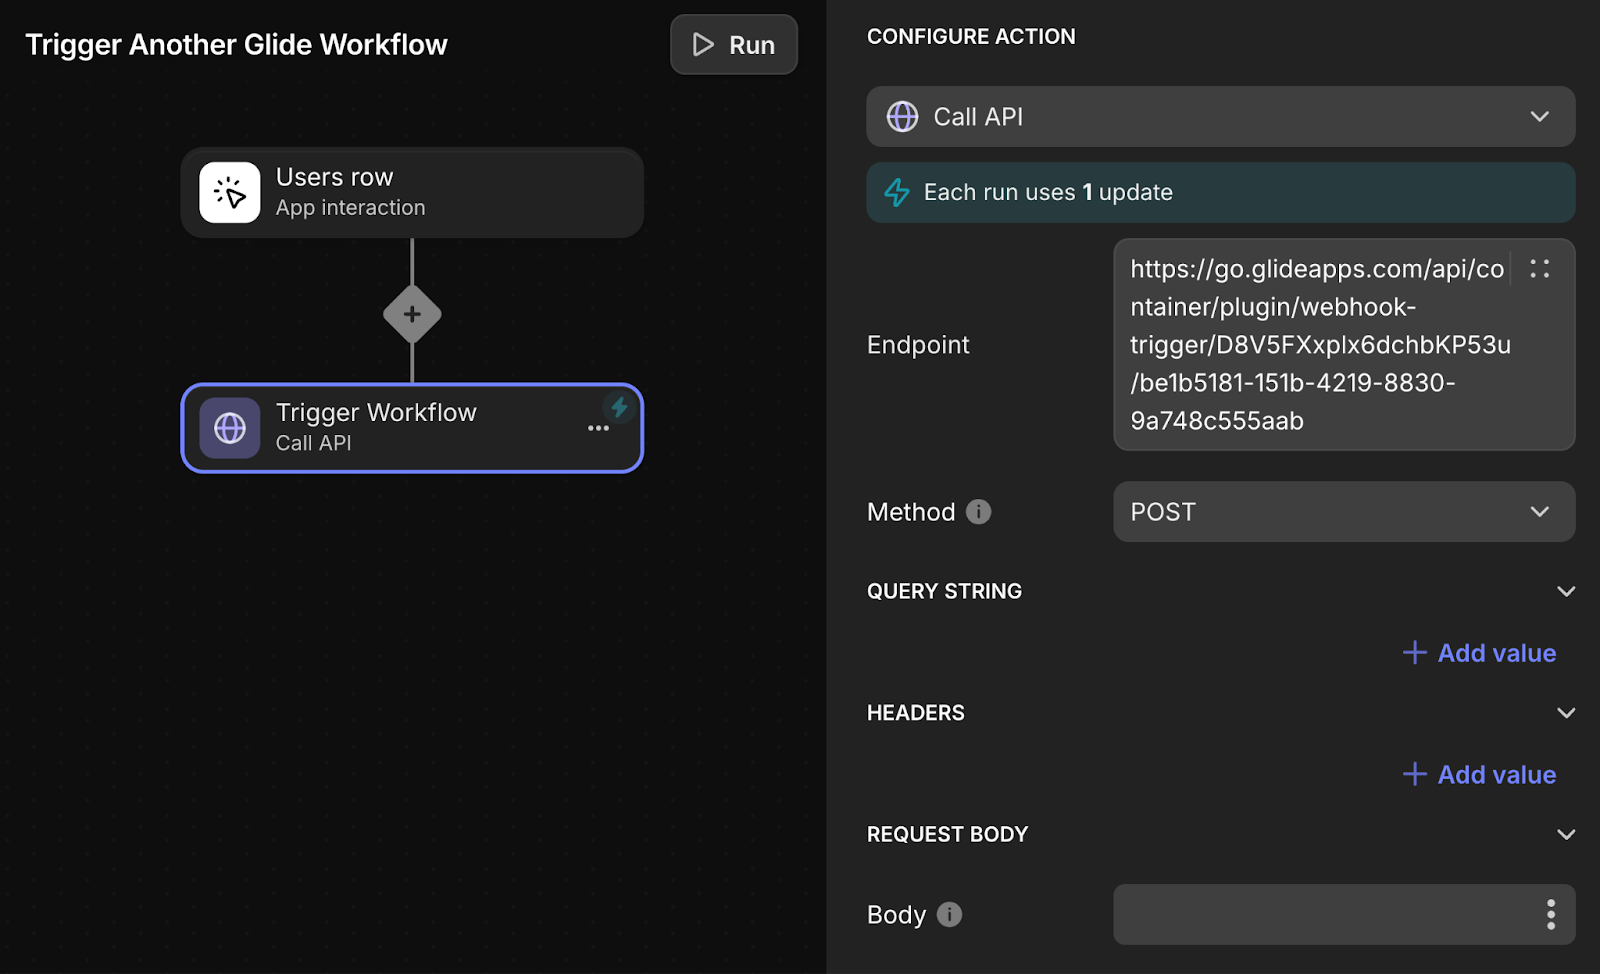
Plus, as your automations grow and become more complex, it can be much easier to manage them by breaking a large workflow into smaller, more manageable components. By structuring your automation as smaller, reusable parts, you gain two big advantages: easier management and the ability to reuse mini workflows across multiple triggers. It’s also a great way to attach multiple triggers to the same core automation, making your setup more efficient and versatile.
Email trigger use cases
Email triggers allow you to handle incoming emails and turn them into actionable data in Glide. They’re great for structuring messy email content, managing attachments, or collaborating with users who don’t have access to your app.
Turn unstructured emails into structured Glide data
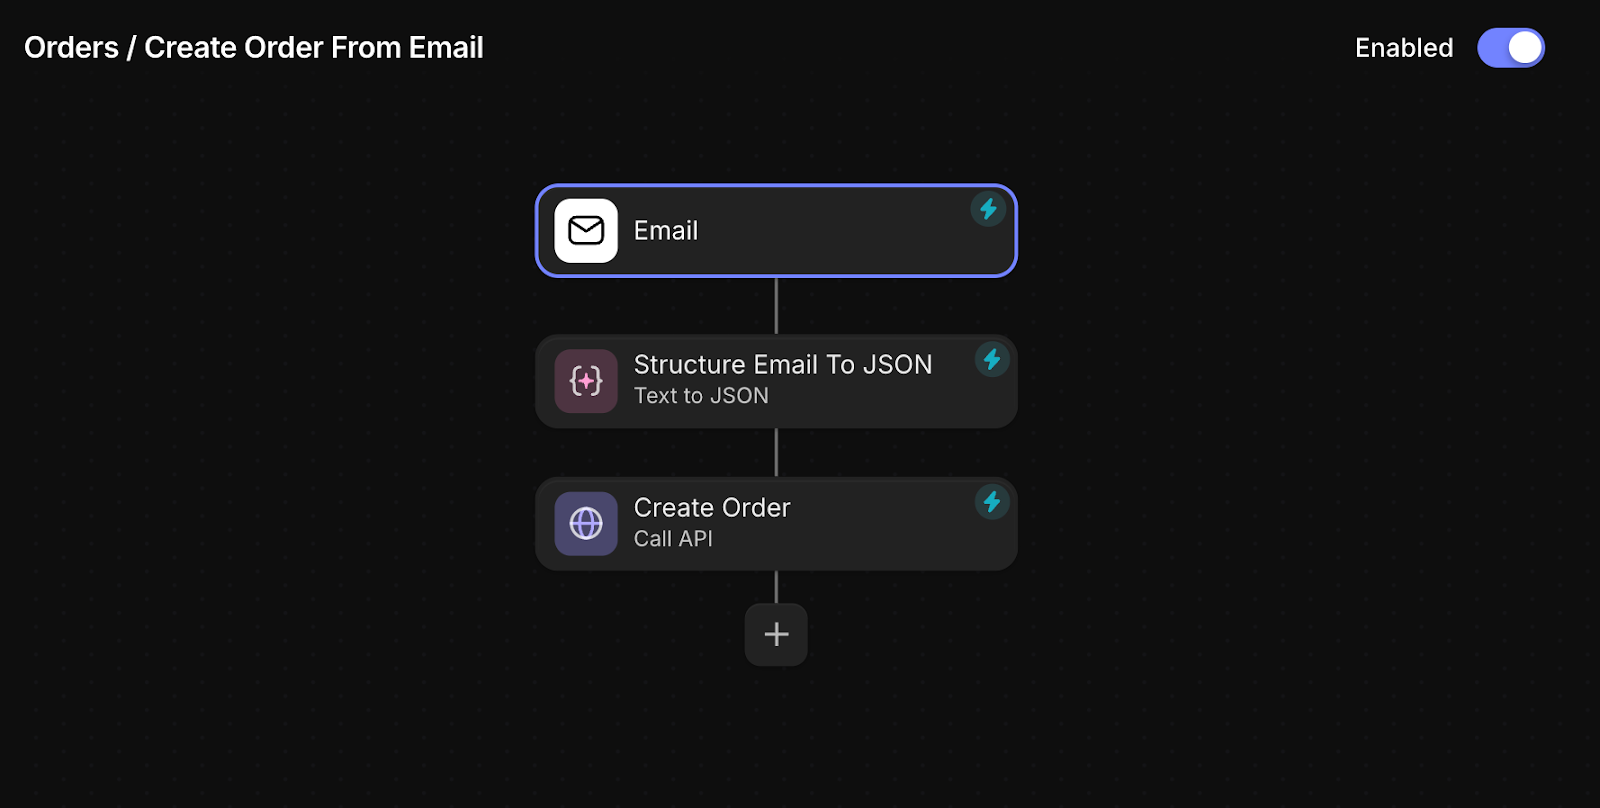
With the combination of automation, AI, and the Email trigger, you can easily turn unstructured email content into structured, actionable data in your Glide app. Glide’s Text to JSON AI action makes it simple to extract the key details from an email and format them into a JSON payload that your app can understand.
For example, when processing an email order, your automation can use AI to pull out important information like the order ID, total, and date and then structure it in a way Glide can use. Once the data is ready, the Call API module adds it directly to your app, putting everything in the right place within your app.
The best part is that once you’ve set the automation up, it’s completely hands-free. Your users don’t need to worry about formatting or structuring anything—the automation does all the heavy lifting for you. It’s efficient and reliable and keeps your order management process running smoothly.
Automatically add email invoices to your Glide app
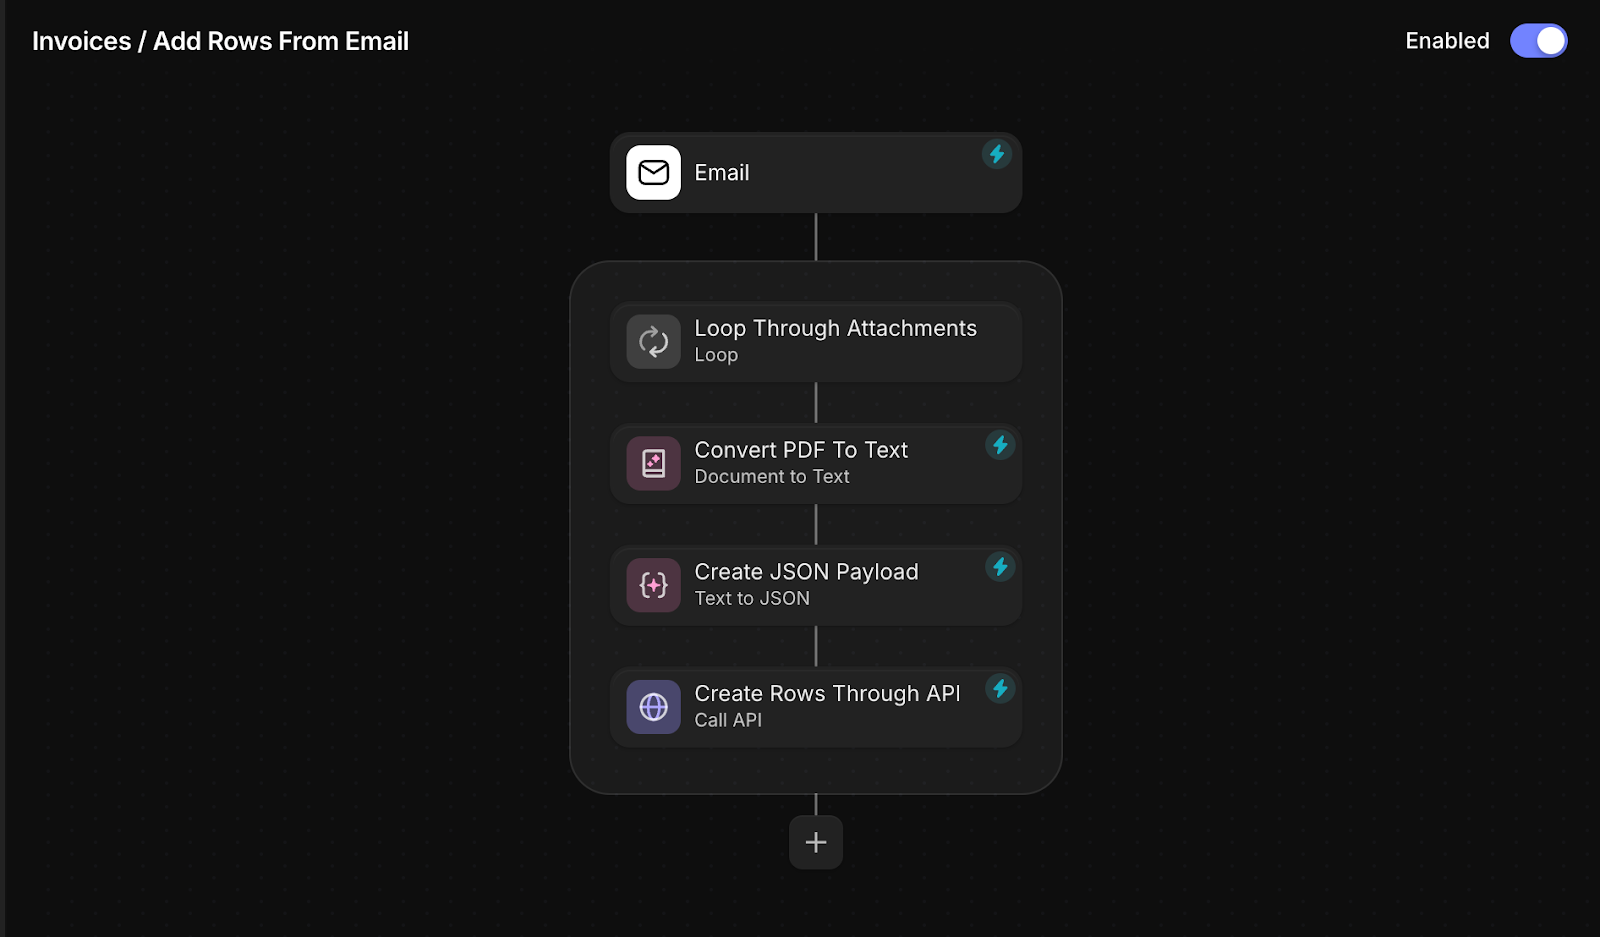
If you have a dedicated invoicing email for vendors or partners, you can streamline your accounting process by forwarding those emails to Glide’s email webhook. Once your Glide app receives the email, you can set up an automation to process the attachments. Using AI, Glide can extract key details from the PDF, such as the invoice ID, vendor, totals, and due dates, and add them directly to your Invoices table.
To make things even smoother, you can configure the automation to notify the approver when an invoice is ready for processing and approval. This setup eliminates the manual hassle of processing invoices, giving you a seamless, efficient way to keep your finances in order without the headaches.
Collaborate with users who don’t have access to your app
If you’re working with clients or teams who don’t have access to your Glide app, you can still collaborate efficiently using the Email trigger. To make this work, you’ll need two automations.
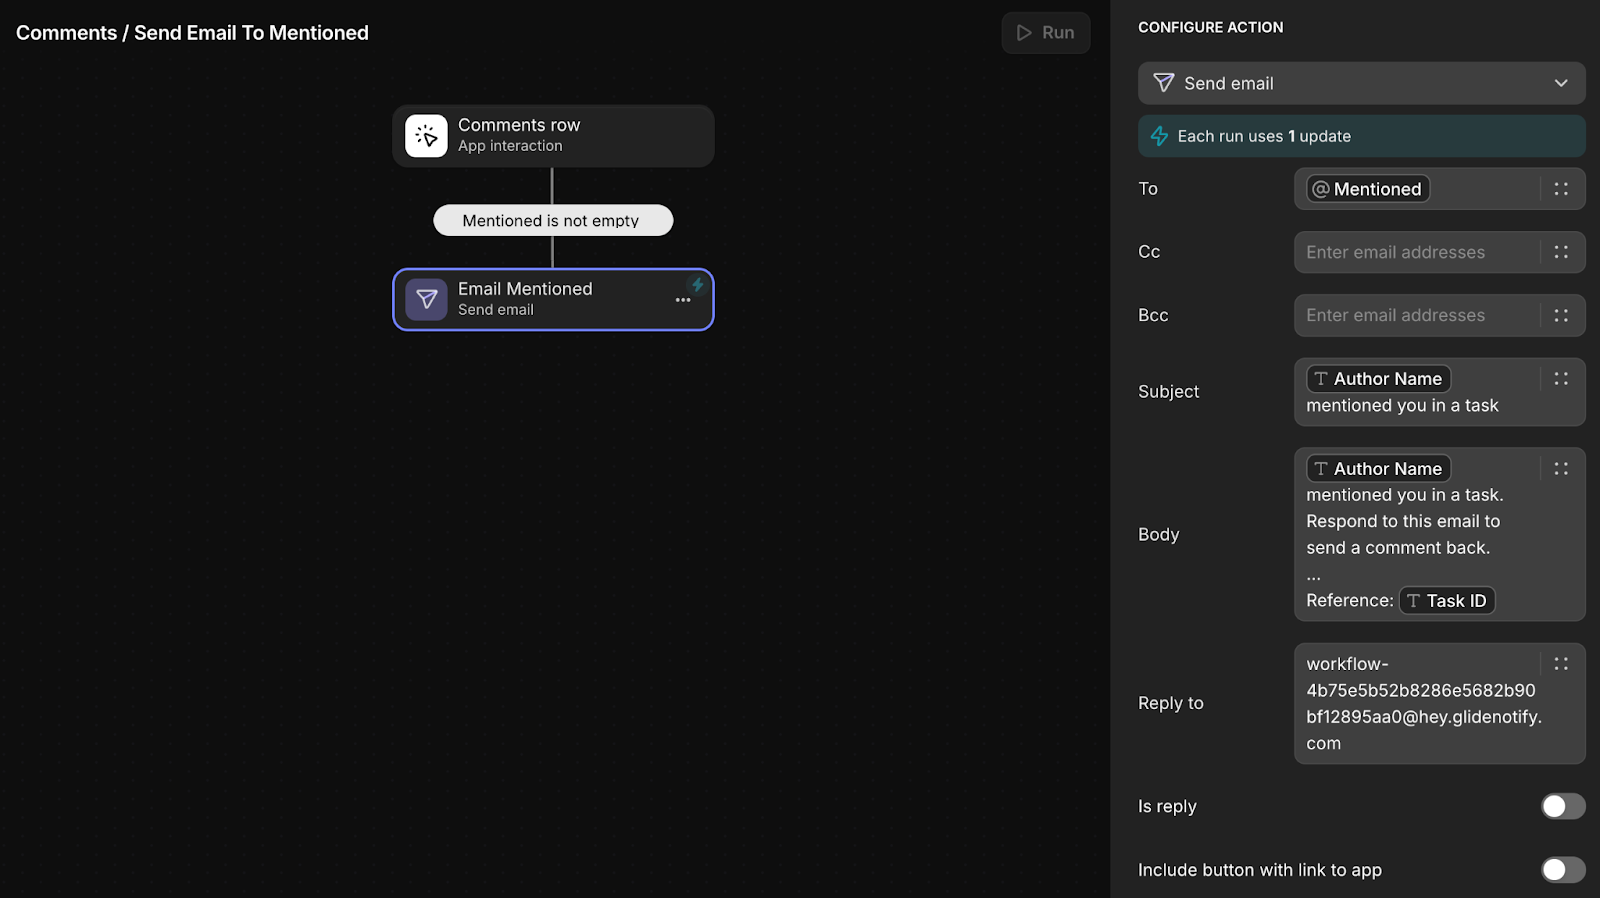
The first automation takes care of notifying external users when they’re “mentioned” in your Glide app. You can create a table with external users and their email addresses and allow your Glide users to mention them in comments. When a mention is made, the automation sends an email to the external user. In the email configuration, you can set the Reply-To address to your Glide Email Webhook and include the object reference (like a Task ID) in the email body. This ensures that when the external user replies, the response can be tied back to the correct task or record.
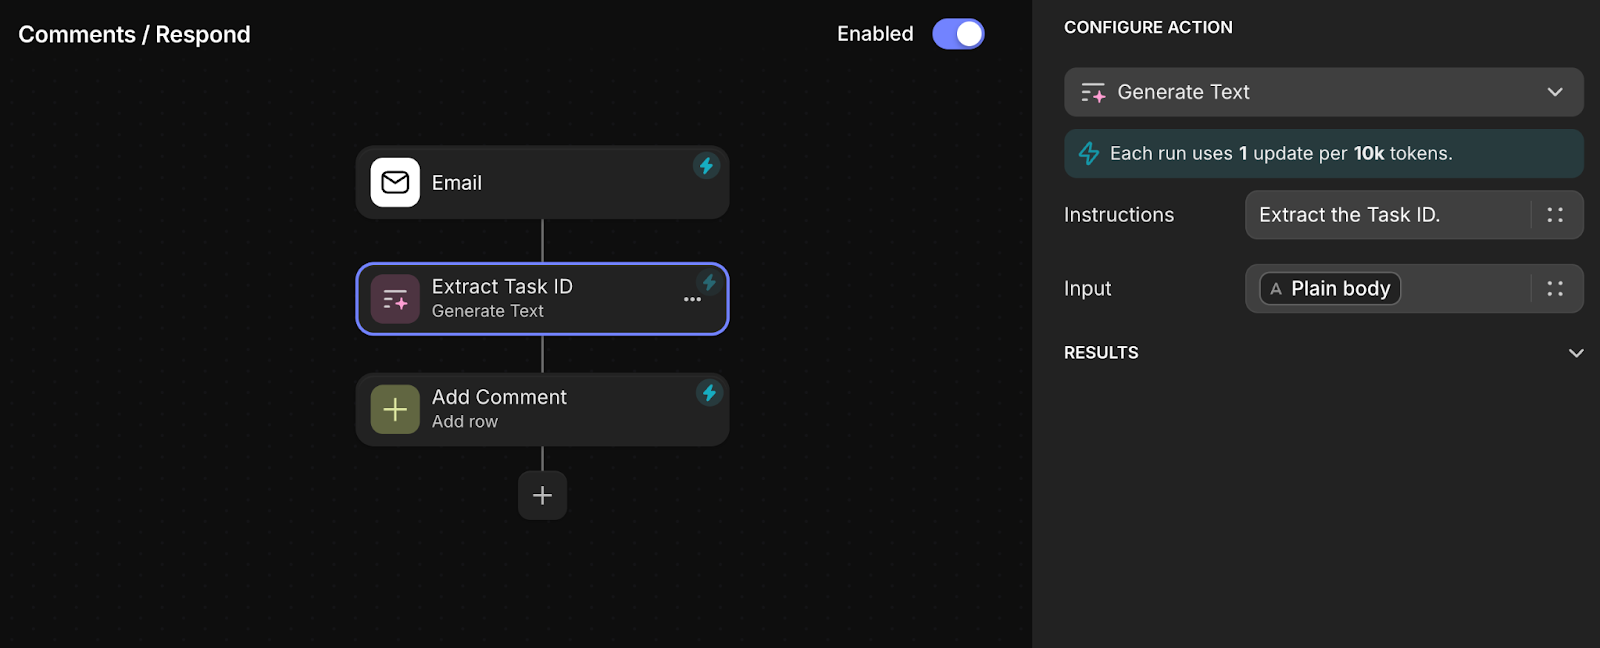
The second automation is designed to process replies from external users and uses the Email Webhook trigger to capture incoming responses. Once Glide receives the response, you can use Glide’s AI to extract the object ID (such as the Task ID) from the email body to make sure the reply comment shows up in the right location in your app. This keeps the conversation organized and visible in the right context, allowing both internal and external users to stay connected and in sync.
Get started building automated Glide apps
In this article, we’ve walked you through how Glide’s Workflows can be used to automate a wide variety of business processes, from syncing Shopify orders and tracking contract signatures to scheduling recurring tasks and turning email chaos into structured, actionable data. These examples are just the beginning of what’s possible. With features like scheduled triggers, webhooks, email automation, loops, nested conditions, and computed steps, Glide now gives you a set of scalable and powerful tools to create workflows that fit your unique needs.
We hope these examples have inspired you to start automating your own processes. The possibilities are endless, and as you dive into building with Glide, you’ll find even more ways to automate your operations and make your business run smoother. Now it’s your turn—go explore, experiment, and create workflows that work for you!


